After writing a blog how to schedule a job through API with PowerShell I also wanted to create this with Python. As a newbie in Python I started reading books to understand Python. From scripting (PowerShell) to an interpreter (Python) programming language was not easy but I’ve to admit Python is an easy to learn language. Please be kind to me when reading and using the 2 programs created to list information from Ivanti Automation and to schedule a job through the Ivanti Automation Dispatcher API.
Ivanti Automation delivers 2 API options. The first option is enabling the Dispatcher WebAPI available in Global Settings (see blog Load Balance Ivanti Automation Dispatcher WebAPI with Citrix ADC).
The second option is delivered in the Ivanti Automation Management Portal. A separate installation which needs IIS (Internet Information Service).
For executing the 2 Python applications download Python and install. Start the IDLE Python and create two files with the code below.
What are APIs?
API is the acronym for Application Programming Interface, which is a software intermediary that allows two applications to talk to each other. When people speak of “an API”, the sometimes generalize and actually mean “an available web-based API that returns data, likely in JSON or XML”.
JSON stands for JavaScript Object Notation and is basically a way of representing data that looks like JavaScript objects.
XML stands for eXtensible Markup Language and is markup language much like HTML and designed to store and transport data.
This blog describes the Dispatcher WebAPI and how to schedule a module, project or runbook. It also describes the different types for the What action and Parameters. Using API needs knowledge about coding. I wrote the examples in PowerShell.
Requirements when scheduling a module, project or runbook
In all my examples below I created a simple Send Message task which opens a popup window on the agent we are going to select in the scripts.
Steps to create the Send Message with 2 parameters
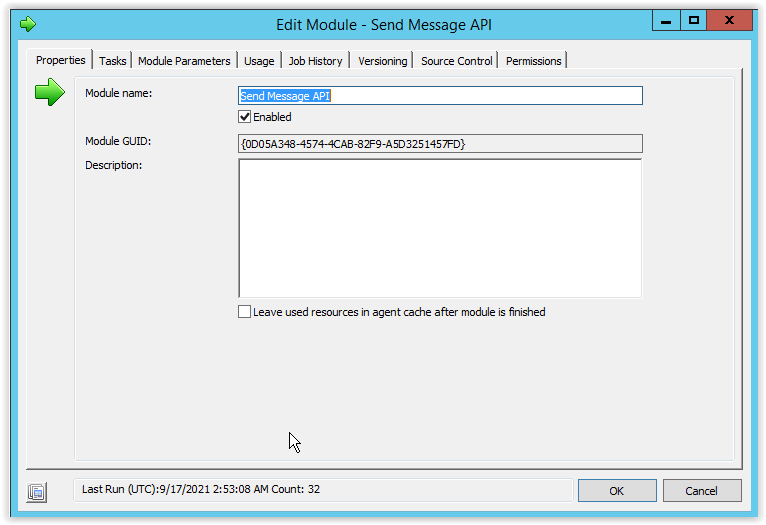
Open the Ivanti Automation Console and got Library – Modules and select New.
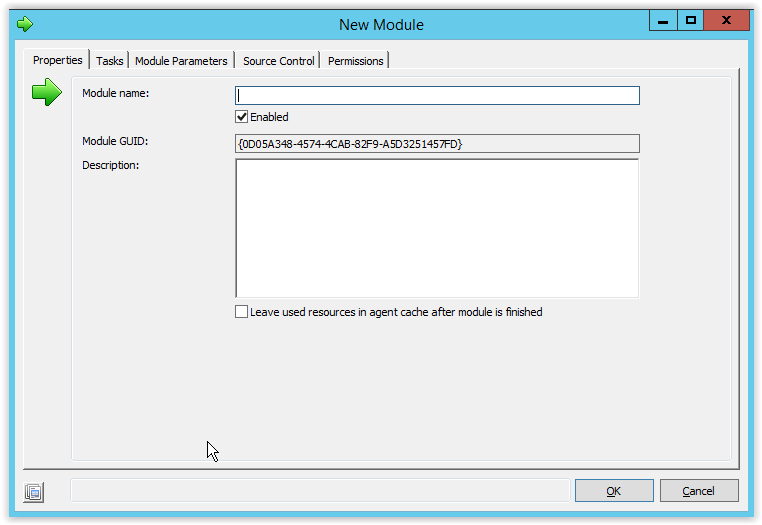
Enter a name for the Module and notice the created Module GUID which is automatically created. This GUID will be used later when scheduling the module through the API.
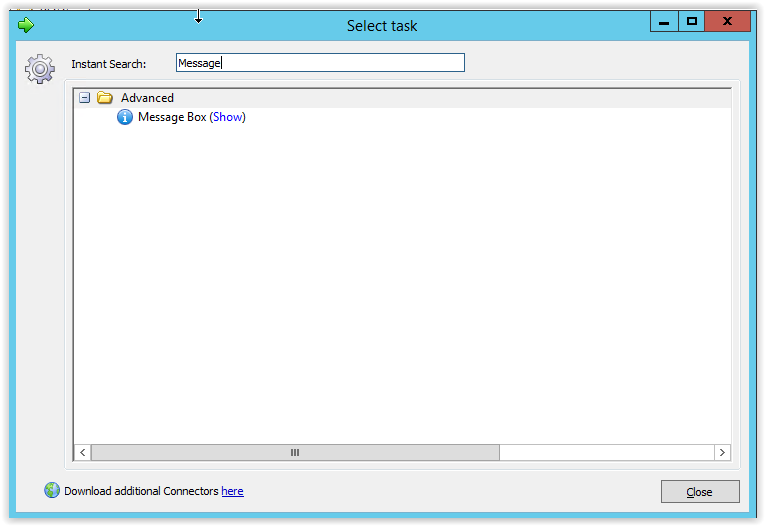
Select the Task tab and select Add. Type Message in the Instant Search field and select the Message Box.
Go to the Module Parameters tab and create 2 parameters (Caption and Message) and select the parameter type Text.
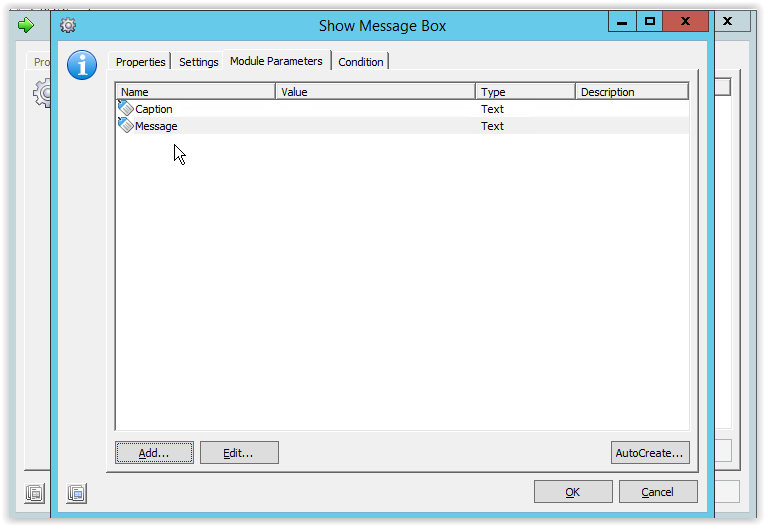
Go back to the Settings tab and add the Caption parameter to the caption field and the Message parameter to the Message field. For better testing set the Display duration to unlimited.
Select OK twice to save and finish the module creation.
With the Ivanti Automation Dispatcher WebAPI enabled a help is available. Open a web browser and enter the IP adres of one of the Dispatchers or a FQDN when using the blog Load Balance Ivanti Automation Dispatcher WebAPI with Citrix ADC (i.e. https://iawebapi.automatedvision.info:8081/Dispatcher/SchedulingService/Help).
Login with an Ivanti Automation Authentication account and the following screen appears.
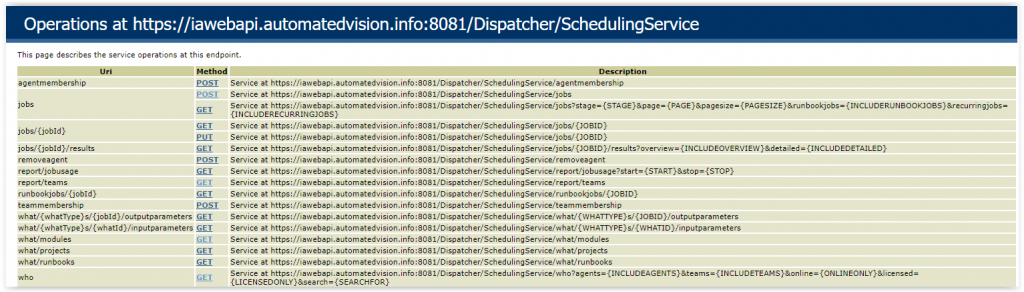
Because we want to schedule a module we choose the jobs POST action to see more information. Select the Request JSON option.
Below is an overview of all available options which can or need be configured in the JSON body.
{
    "User":"String content",
    "AuthType":0,
    "Description":"String content",
    "When":{
        "ScheduledDateTime":"\/Date(928171200000-0600)\/",
        "Immediate":true,
        "IsLocalTime":true,
        "UseWakeOnLAN":true,
        "IsRecurring":true,
        "RecurringSchedule":{
            "IntervalType":0,
            "Period":"String content",
            "Interval":2147483647,
            "StartTime":"String content",
            "EffectiveDate":"String content"
        },
        "IsEveryBoot":true,
        "IsNewAgent":true,
        "IsNextBoot":true,
        "OfflineAgentsNextBoot":true,
        "OrOnResume":true
    },
    "What":[{
        "ID":"String content",
        "Type":0,
        "Name":"String content"
    }],
    "Who":[{
        "ID":"String content",
        "Type":0,
        "Name":"String content"
    }],
    "Parameters":[{
        "Identifier":"String content",
        "Type":0,
        "TaskContainerGuid":"String content",
        "TaskContainerName":"String content",
        "JobGuid":"String content",
        "JobName":"String content",
        "JobParameters":[{
            "Name":"String content",
            "Type":2147483647,
            "Description":"String content",
            "Value1":"String content",
            "Value2":"String content",
            "Value3":"String content",
            "Hint":"String content",
            "Selection":"String content",
            "TaskContainerGuid":"String content",
            "TaskContainerType":"String content"
        }]
    }],
    "Timeout":"String content",
    "LaunchWindowFlags":0,
    "Scheduled":true,
    "MasterJobId":"String content",
    "RescheduledTasks":[{
        "ID":"String content",
        "Enabled":"String content"
    }],
    "ReloadJobData":true,
    "ScheduleInParallel":true,
    "Tags":"String content",
    "IsReschedule":true,
    "RescheduleId":"String content",
    "JobInvoker":"String content"
}
As you probably noticed all options available in the Schedule Job are also available in this format. Be aware that not all options are needed. For example, when scheduling the job immediately some options in the When section is not needed.
But let’s start with the important sections and which are used in this blog to schedule the Send Message API module.
In the What, Who and Parameters section we use an option Type. See below what type corresponds with.
What
Type 0 module
Type 1 project
Type 2 runbook
ID is the GUID of the module/project/runbook. GUID is shown on the Properties tab.
Who
Type 0 agent
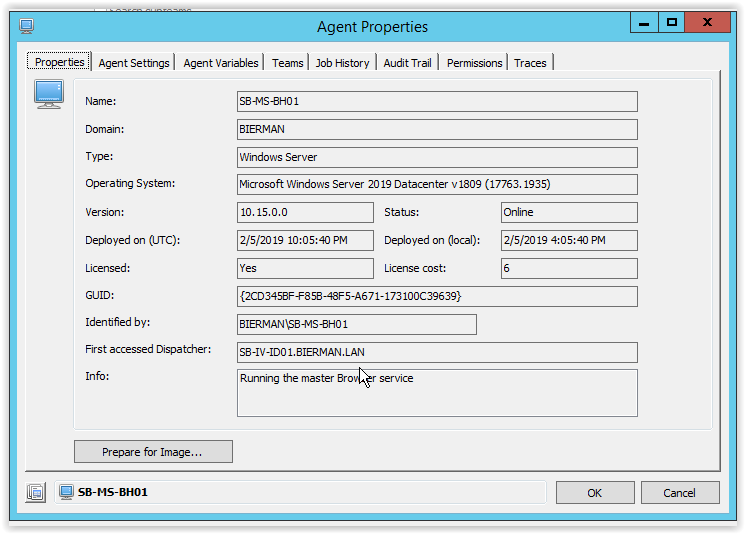
ID is the GUID of the agent. GUID is shown on the Properties tab of the agent in Topology – Agents.
Parameters
Type 0 Text
Type 1 List
Type 2 Credentials
Type 3 Multi-select list
Type 4 Multi-line text
Type 5 Password
At the end of this blog I added a Python application to get a list of all modules, projects, runbooks and agent names and GUIDs.
First step is creating the body in a text editor (i.e. Notepad++). Below you find an example of executing the Send Message API module on 2 agents and with the use of PS parameter which is used in the JobParameters section and one parameter is using text.
$body = '{
"Description":" Send Message API ",
"When": {"Immediate": true,
"IsLocalTime": true,
"UseWakeOnLAN": false},
"What": [{
    "ID":" 0D05A348-4574-4CAB-82F9-A5D3251457FD ",
    "Type": 0,"Name":" Send Message API "
    }],
"Who": [{
    "ID":" 4FF6C7C2-4D63-47F7-AE28-CE8BDA0BA36D ",
    "Type": 0,
    "Name":" SB-IV-AM02 "
    },
    {
    "ID":" 325282B6-2099-4FBB-B60B-38EC4F96E755 ",
    "Type": 0,
    "Name":" SB-IV-AM01 "
    }],
"Parameters": [{
    "Identifier":"'+$Parameter_Identitifier+'",
    "Type": 0,
    "TaskContainerGuid":" 0D05A348-4574-4CAB-82F9-A5D3251457FD ",
    "TaskContainerName":" Send Message API ",
    "JobGuid": "{00000000-0000-0000-0000-000000000000}",
    "JobName": "",
        "JobParameters": [{
            "Name":"Caption",
            "Type":0,
            "Description":"",
            "Value1":"This is a test",
            "Hint":"Please provide the necessary input",
            "Selection":""
            },
            {
            "Name":"Message",
            "Type":0,
            "Description":"",
            "Value1":"'+$Parameter_Message+'",
            "Value2":"",
            "Value3":"",
            "Hint":"Please provide the necessary input",
            "Selection":""
            }]
            }]
            }'
Next step is creating the full application (Python) to schedule the Module.
# importing the required libraries
import requests
import json
import base64
import uuid
import ssl

# define parameters

username = '<Automation UserID'
password = '<Automation Password'
url = "https://FQDN or Automation Dispatcher IP/Dispatcher/SchedulingService/Jobs"
identifier = uuid.uuid4().hex
message = 'Test in Progress with Python'

# create basic authentication
credentials = username + ":" + password
# Encode with base64
base64_credentials = base64.b64encode(credentials.encode("utf8"))
credential = base64_credentials.decode("utf8")

# Configure the Payload/Body (JSON)
payload = json.dumps({
  "Description": " Send message API ",
  "When": {
    "ScheduledDataTime":"/Date(1631908263000}/",
    "Immediate": True,
    "IsLocalTime": True,
    "UseWakeOnLAN": False
  },
  "What": [
    {
      "ID": " 0D05A348-4574-4CAB-82F9-A5D3251457FD ",
      "Type": 0,
      "Name": " Send Message API "
    }
  ],
  "Who": [
    {
      "ID": " 325282B6-2099-4FBB-B60B-38EC4F96E755 ",
      "Type": 0,
      "Name": " SB-IV-AM01 "
    },
        {
      "ID": " 4FF6C7C2-4D63-47F7-AE28-CE8BDA0BA36D ",
      "Type": 0,
      "Name": " SB-IV-AM02 "
    }
  ],
  "Parameters": [{
    "Identifier": identifier,
    "Type": 0,
    "TaskContainerGuid":" 0D05A348-4574-4CAB-82F9-A5D3251457FD ",
    "TaskContainerName":" Send Message API ",
    "JobGuid": "{00000000-0000-0000-0000-000000000000}",
    "JobName": "",
        "JobParameters": [{
            "Name":"Caption",
            "Type":0,
            "Description":"",
            "Value1":"This is a test",
            "Hint":"Please provide the necessary input",
            "Selection":""
            },
            {
            "Name":"Message",
            "Type":0,
            "Description":"",
            "Value1": message,
            "Value2":"",
            "Value3":"",
            "Hint":"Please provide the necessary input",
            "Selection":""
            }]
        }]
})

# create the header
headers = {}
headers['Authorization'] = 'basic ' + credential
headers['Content-Type'] = 'application/json'

# Execute the webrequest to schedule the task
response = requests.request("POST", url, headers=headers, data=payload)

# Show the response. Not required but returns response during testing
print(response.text)
Below is the Python application that list all modules, projects, runbooks and agents with the GUID. Choose to display the output on screen or write to a txt file.
# importing the required libraries
import requests
import base64
import array as arr
import xml.etree.ElementTree as ET
import certifi
import operator
from prettytable import PrettyTable


# define parameters
username = '<Automation UserID>'
password = '<Automation Password>'
url = "https://<FQDN or Dispatcher IP>/Dispatcher/SchedulingService/what/"
url1 = "https://<FQDN or Dispatcher IP>/Dispatcher/SchedulingService/who?agents=true"

output_data = eval(input("Select your output - Screen(1), Text file(2): "))
if output_data == 2:
    text_folder = input("Enter the folder and filename for the textfile (i.e. C:\Data\IA-Output.txt): ")
    f= open(text_folder,"w+")

# define Prettytable parameters
x = PrettyTable()
x.field_names = ["Guid", "Type", "Name"]
x.align["Name"] = "l"
x.sortby = "Type"

# create basic authentication
credentials = username + ":" + password
# Encode with base64
base64_credentials = base64.b64encode(credentials.encode("utf8"))
credential = base64_credentials.decode("utf8")

# create the header
headers = {}
headers['Authorization'] = 'basic ' + credential
headers['Content-Type'] = 'application/json'

# Execute API Requests
payload_modules = requests.request("GET", url + "modules", headers=headers)
root_modules = ET.fromstring(payload_modules.content)

payload_projects = requests.request("GET", url + "projects", headers=headers)
root_projects = ET.fromstring(payload_projects.content)

payload_runbooks = requests.request("GET", url + "runbooks", headers=headers)
root_runbooks = ET.fromstring(payload_runbooks.content)

payload_agents = requests.request("GET", url1, headers=headers)
root_agents = ET.fromstring(payload_agents.content)

for sitemap in root_modules:
    children = list(sitemap)
    Guid = children[0].text
    Type = children[1].text
    Name = children[2].text
    x.add_row([Guid, Type, Name])
    #writer.writerow(str([Guid, Type, Name]))

for sitemap in root_projects:
    children = list(sitemap)
    Guid = children[0].text
    Type = children[1].text
    Name = children[2].text
    x.add_row([Guid, Type, Name])

for sitemap in root_runbooks:
    children = list(sitemap)
    Guid = children[0].text
    Type = children[1].text
    Name = children[2].text
    x.add_row([Guid, Type, Name])

for sitemap in root_agents:
    children = list(sitemap)
    Guid = children[0].text
    Type = children[1].text
    Name = children[2].text
    x.add_row([Guid, Type, Name])

# Show prettytable output of Modules, Projects and Runbooks
if output_data == 1:
    print(x.get_string(sort_key=operator.itemgetter(2,0), sortby="Name"))
else:
    f.write(str(x))
    f.close()