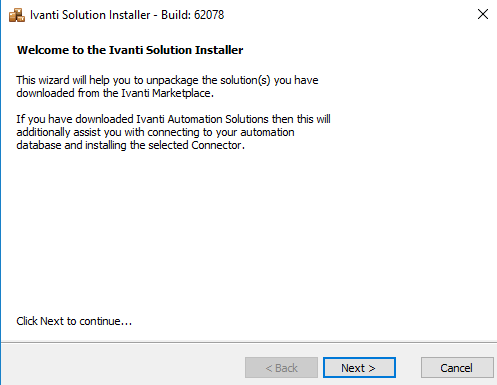
Before configuring Ivanti Automation and Ivanti Service Manager integration the add-on needs be downloaded from the Marketplace website.
The Marketplace website is an Ivanti website and delivers many integrations for multiple vendors.
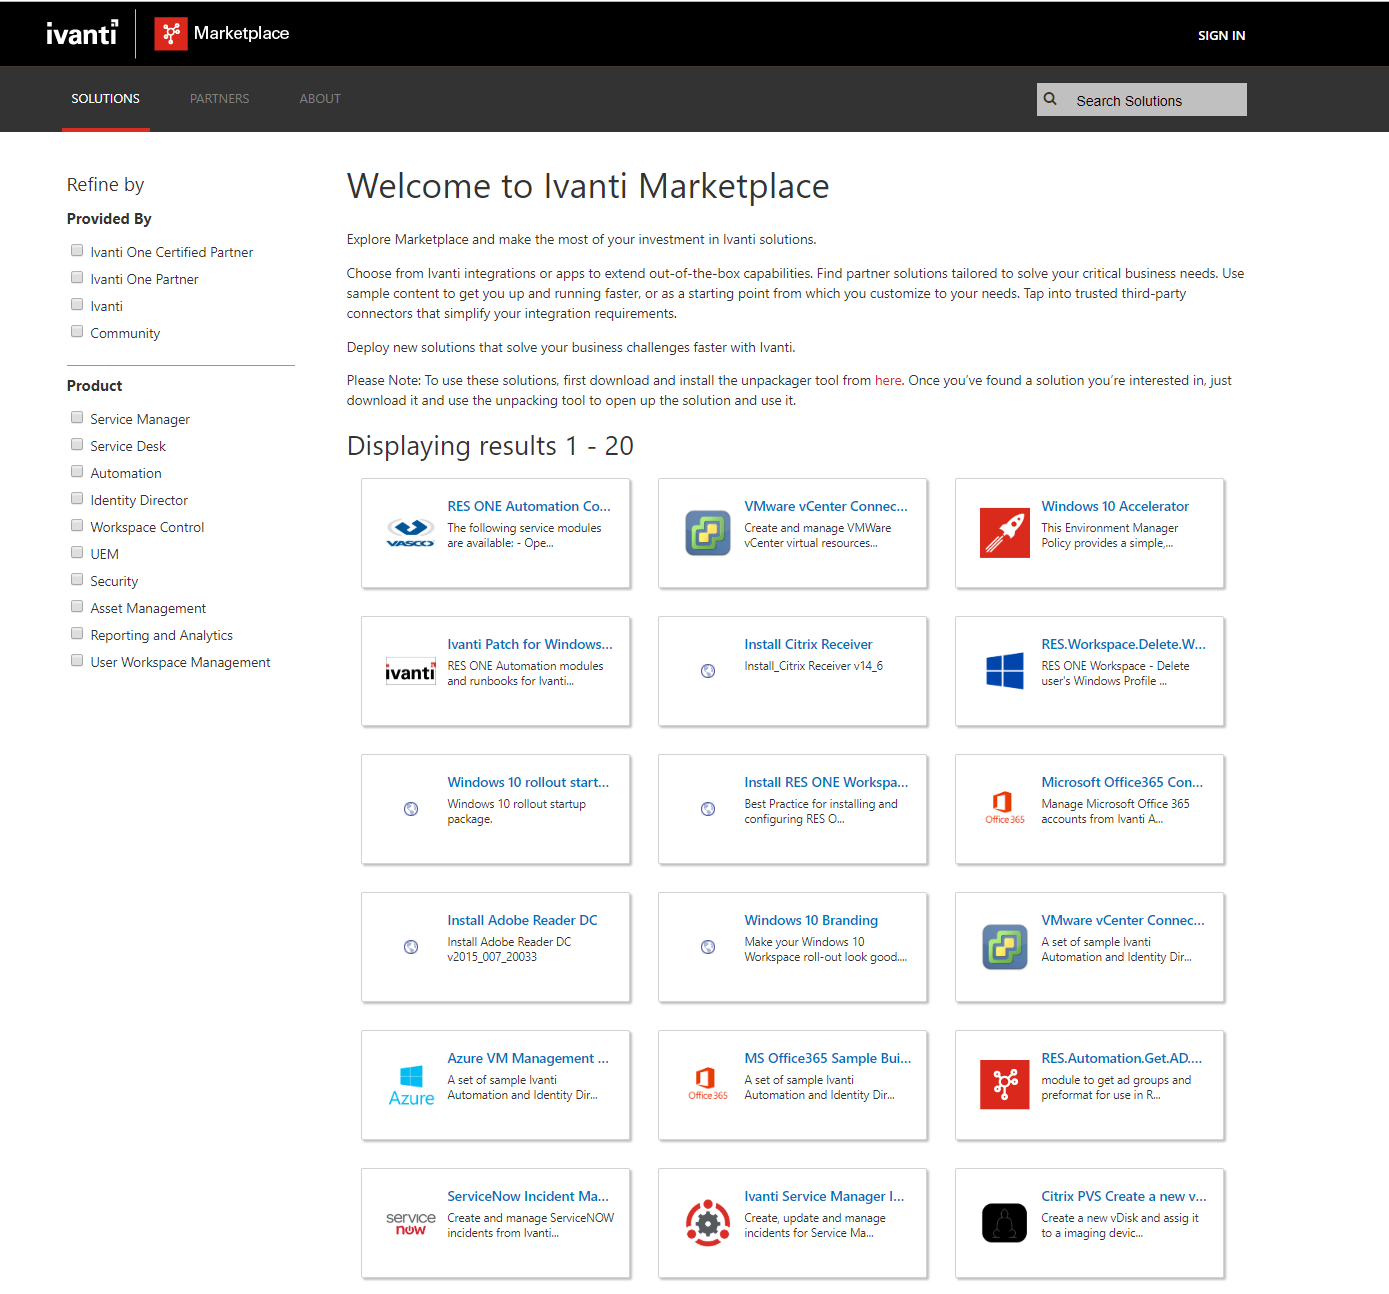
Before downloading any packages, we need to logon. In the right top the option Sign In is available.
After choosing the Sign In option the following screen appears.
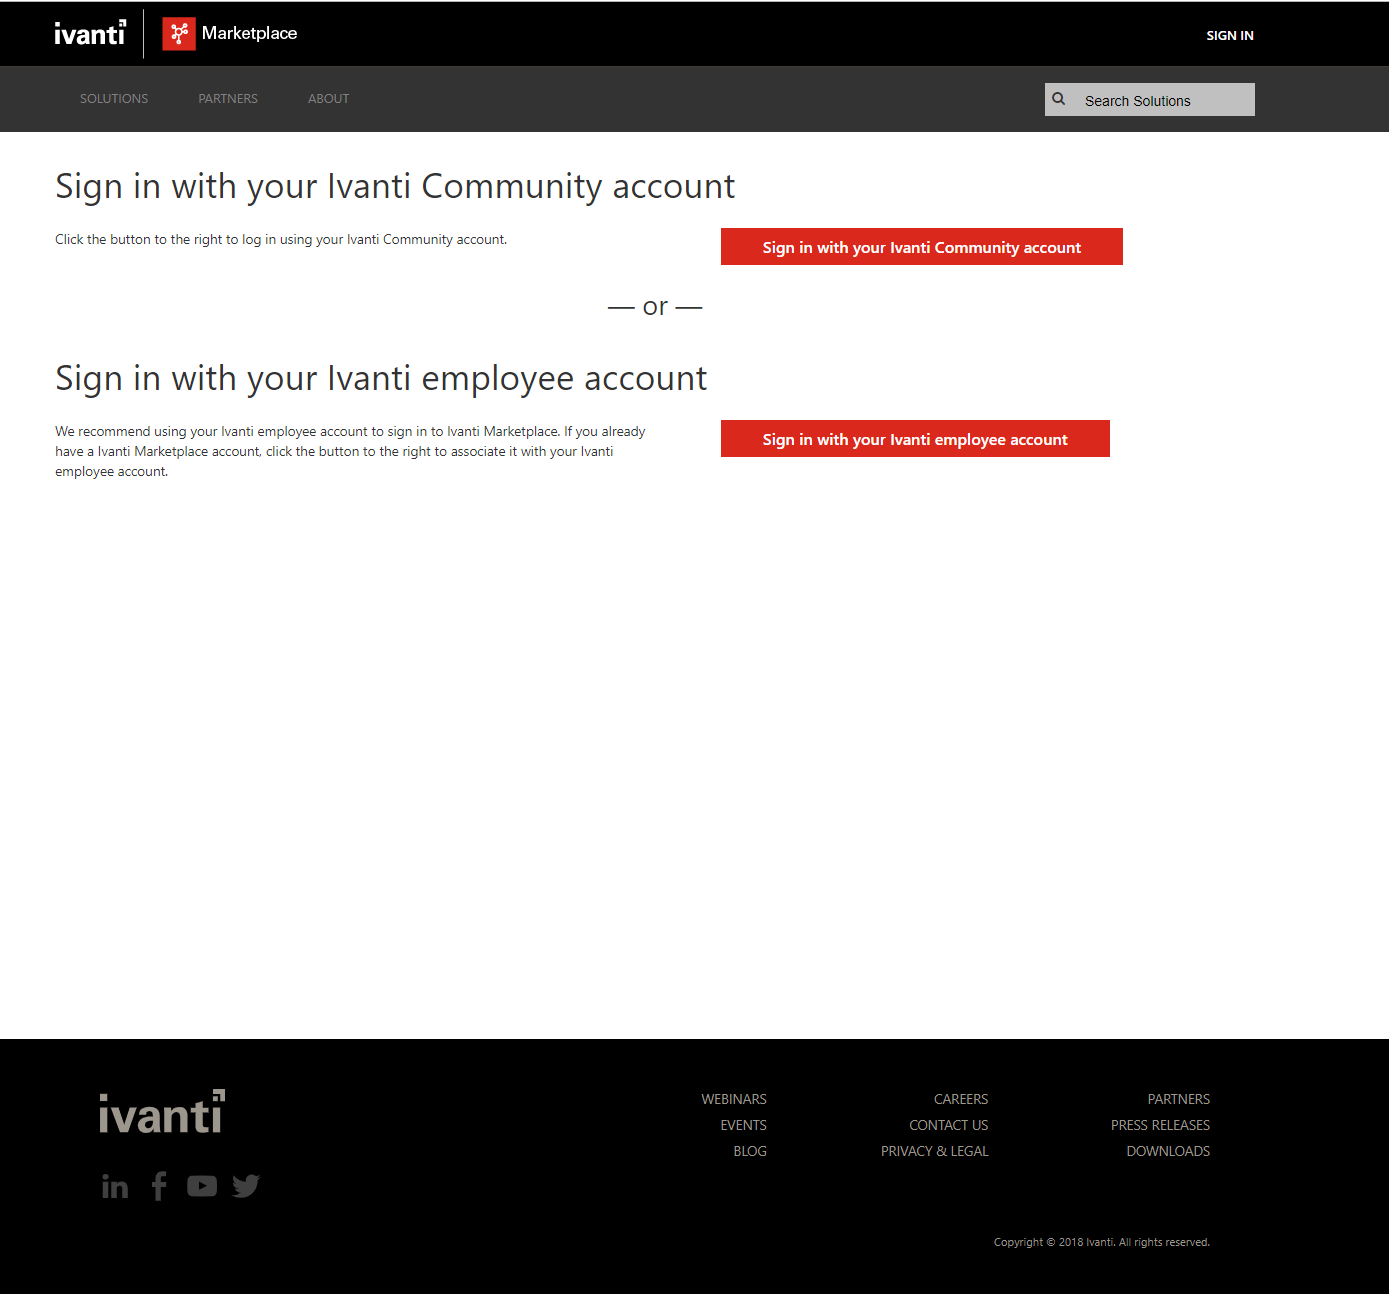
Select the option Sign in with your Ivanti Community account and continue. When signed in search in the Search Solution for the following connector Ivanti Service Manager Utility Connector.
In the overview of add-ons, the required connector is probably the first.
Select the connector and select the Manual download under Info. Before adding the connector, we need to download the Ivanti Marketplace Solution Installer. Select About in the top menu and scroll down till the Install and extract solutions option.
And select the option Download the Ivanti Marketplace Solution Installer.
After downloading the Marketplace Solution Installer. The connector can be installed. Follow the steps below to install the connector.
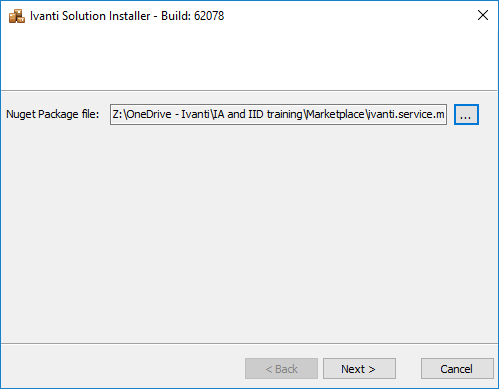
Start the file Ivanti Marketplace Solution Installer (file is also available in the shared folder location in the Marketplace folder).
Select Next to continue.
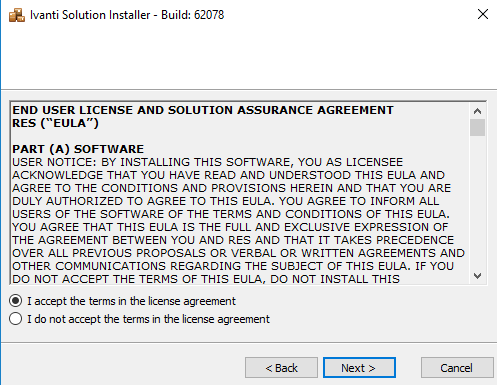
Accept the license agreement and continue.
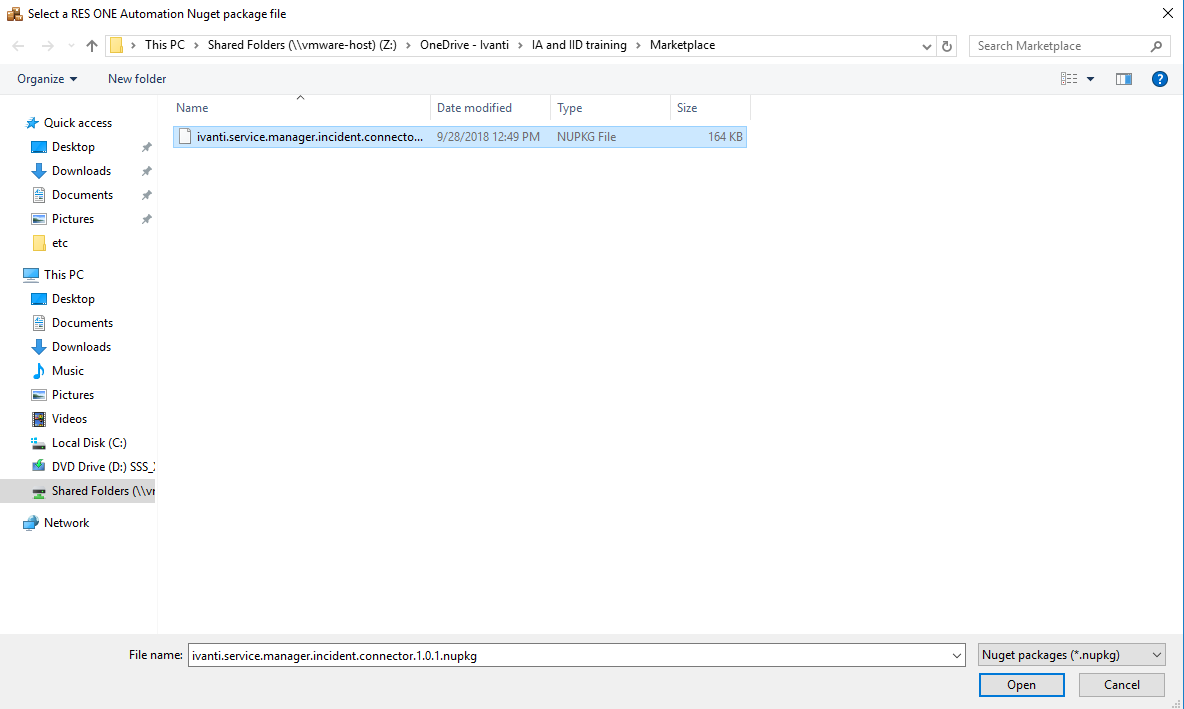
Search for the connector by selecting the 3 dots icon.
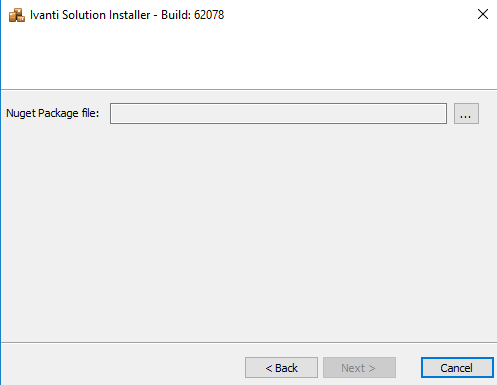
Select the downloaded connector and continue.
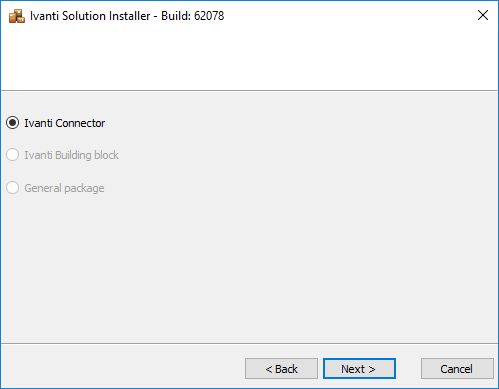
Because the ISM integration is only a connector you can’t select other option. Select Next to continue.
Select Next to continue.
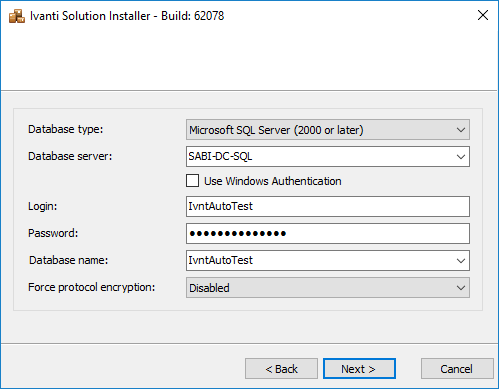
When installing the connector on a machine with the Ivanti Automation components installed the database settings are filled in the next screen. Only the password need to be re-typed!
When the settings are correct select Next to continue.
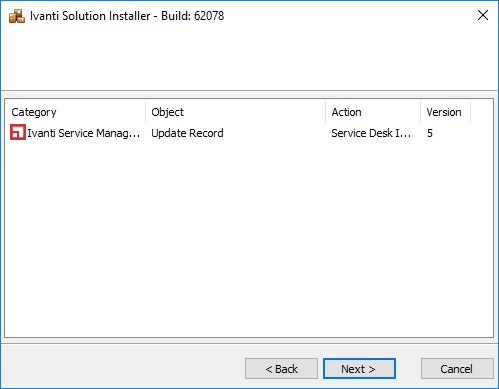
Select Upgrade to import the connector in the Ivanti Automation Tasks.
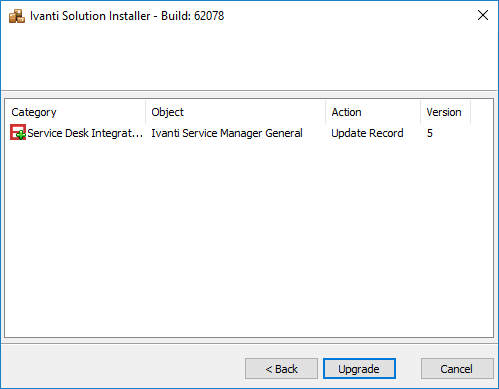
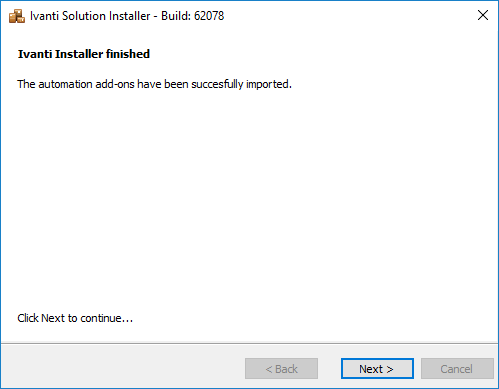
After a successful upgrade click Next to continue and the Ivanti Marketplace Solution Installer is closed.
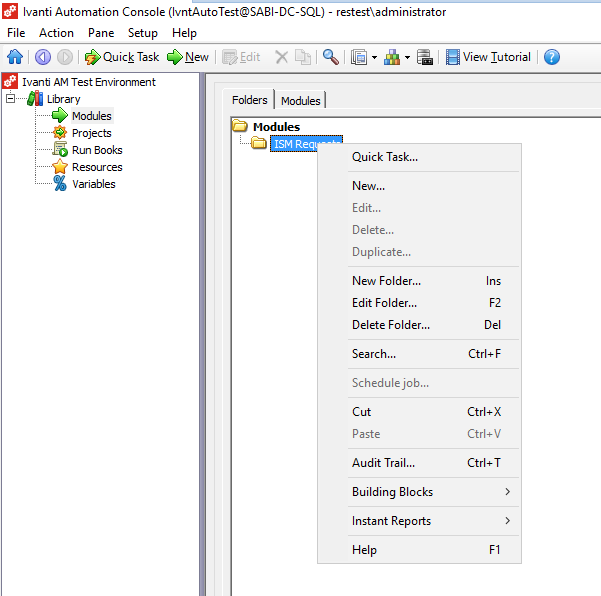
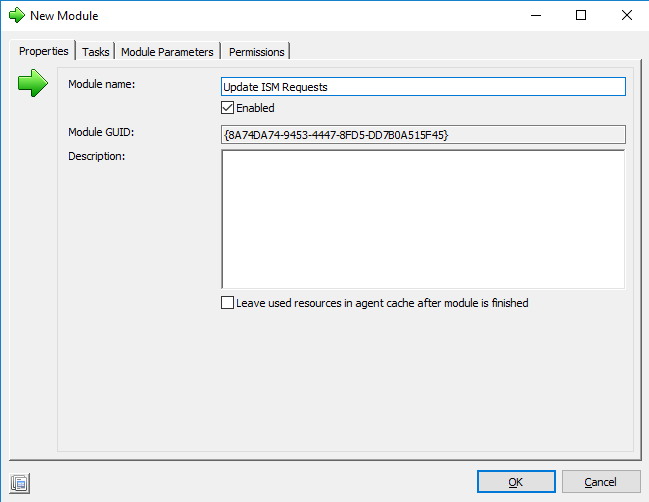
To check if the connector is available in Ivanti Automation open the console and create a new Module.
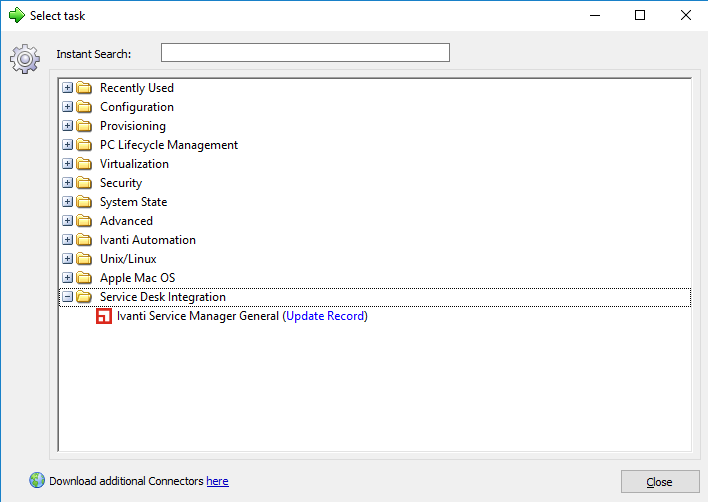
Go to the Tasks tab and select Add. In the Tasks list the Service Desk Integration with the task Ivanti Service Manager General (Update Record) is available.
Next step is creating the Variables needed for the Ivanti Service Manager connector.
The following Global Variables need to be created.
- Ivanti Service Manager Tenant URL
- Ivanti Service Manager UserName
- Ivanti Service Manager Password
- Ivanti Service Manager Tenant
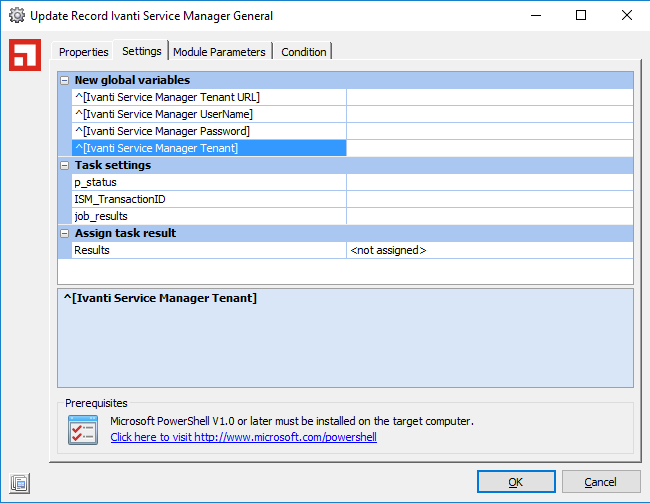
When selecting the task in the settings the global variables are shown which means they are not created in the global variables’ settings.
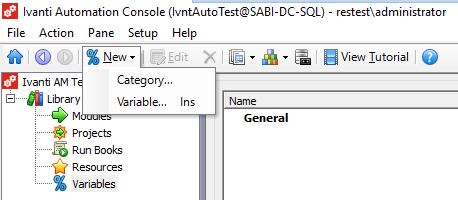
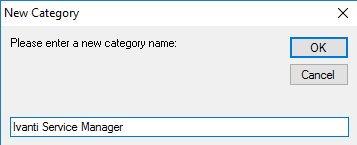
Go to Library -> Variables and select New Category from the New option in the menu bar or select New Category from the system menu when right mouse click in the right field.
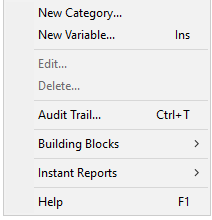
Create a new category and name this Ivanti Service Manager and select OK.
Next step is creating the 4 required global variables. Create a new variable by selecting the option New Variable in the menu as shown above.
Ivanti Service Manager Tenant URL
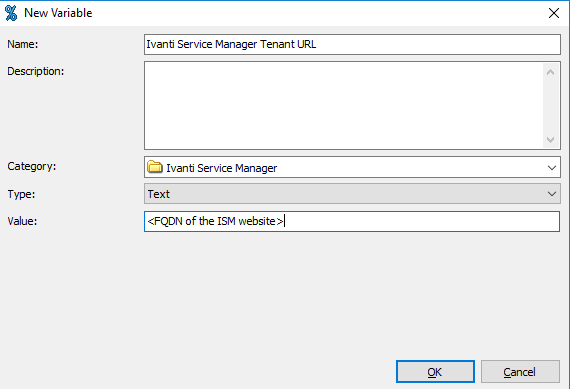
Value is the FQDN of the ISM Website
Ivanti Service Manager UserName
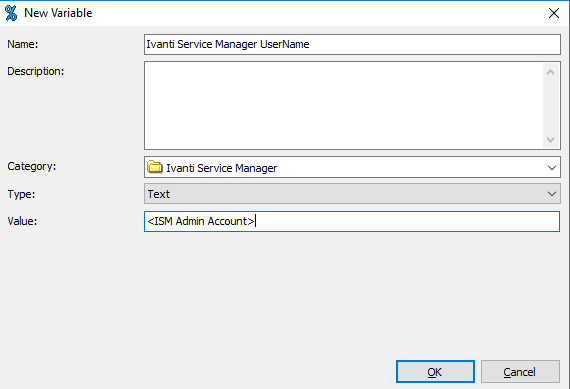
Value is an Admin Account to logon to the ISM Website
Ivanti Service Manager Password
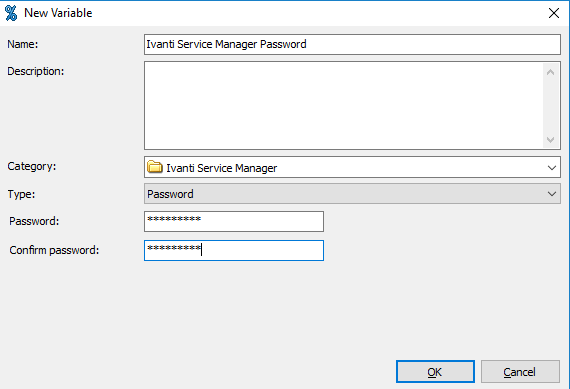
Value is the password related to the ISM Admin password.
Note: make sure the Type is set to Password. Value is shown as password.
Ivanti Service Manager Tenant
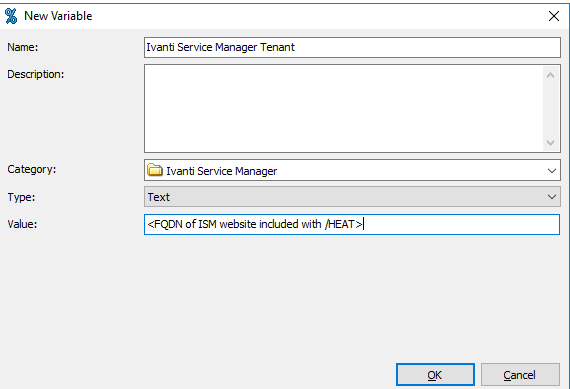
Value is the FQDN name of the ISM website included with /HEAT.
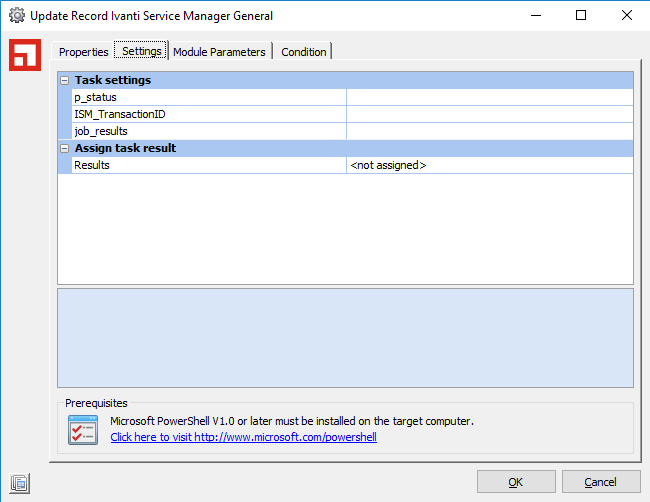
When creating a new module with the Update Record Ivanti Service Manager General task the Global Variables are not visible.
Next step is creating an Update status ISM module and is added to all Runbooks related to ISM Requests.
Go to Library -> Modules and create a new folder with the name ISM Requests.
Create a new Module conform the steps below described.
Select New from the system menu when selecting the ISM Requests folder.
Give the Module a name like Update ISM Requests.
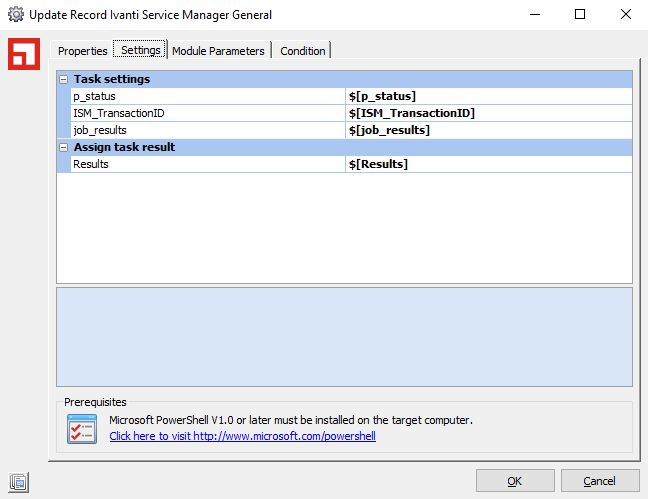
Go to the Tasks tab and select Add to create a new task. Select the task Ivanti Service Manager General from the Service Desk Integration folder.
Select the Update record behind the task name.
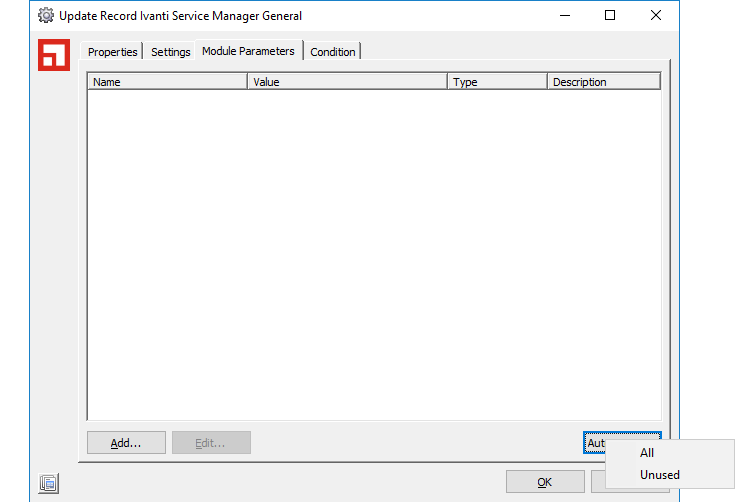
The task needs 4 module parameters which are not created automatically. Select the tab Module Parameters and select the AutoCreate in the right bottom corner. Use the option All to create all parameters.
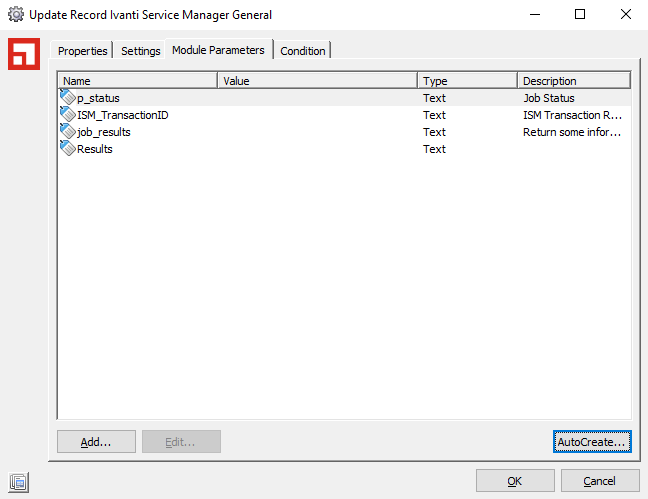
All parameters needed are created and connected to the Task Settings.
Click twice on OK and the Module is created and shown in the ISM Requests folder.
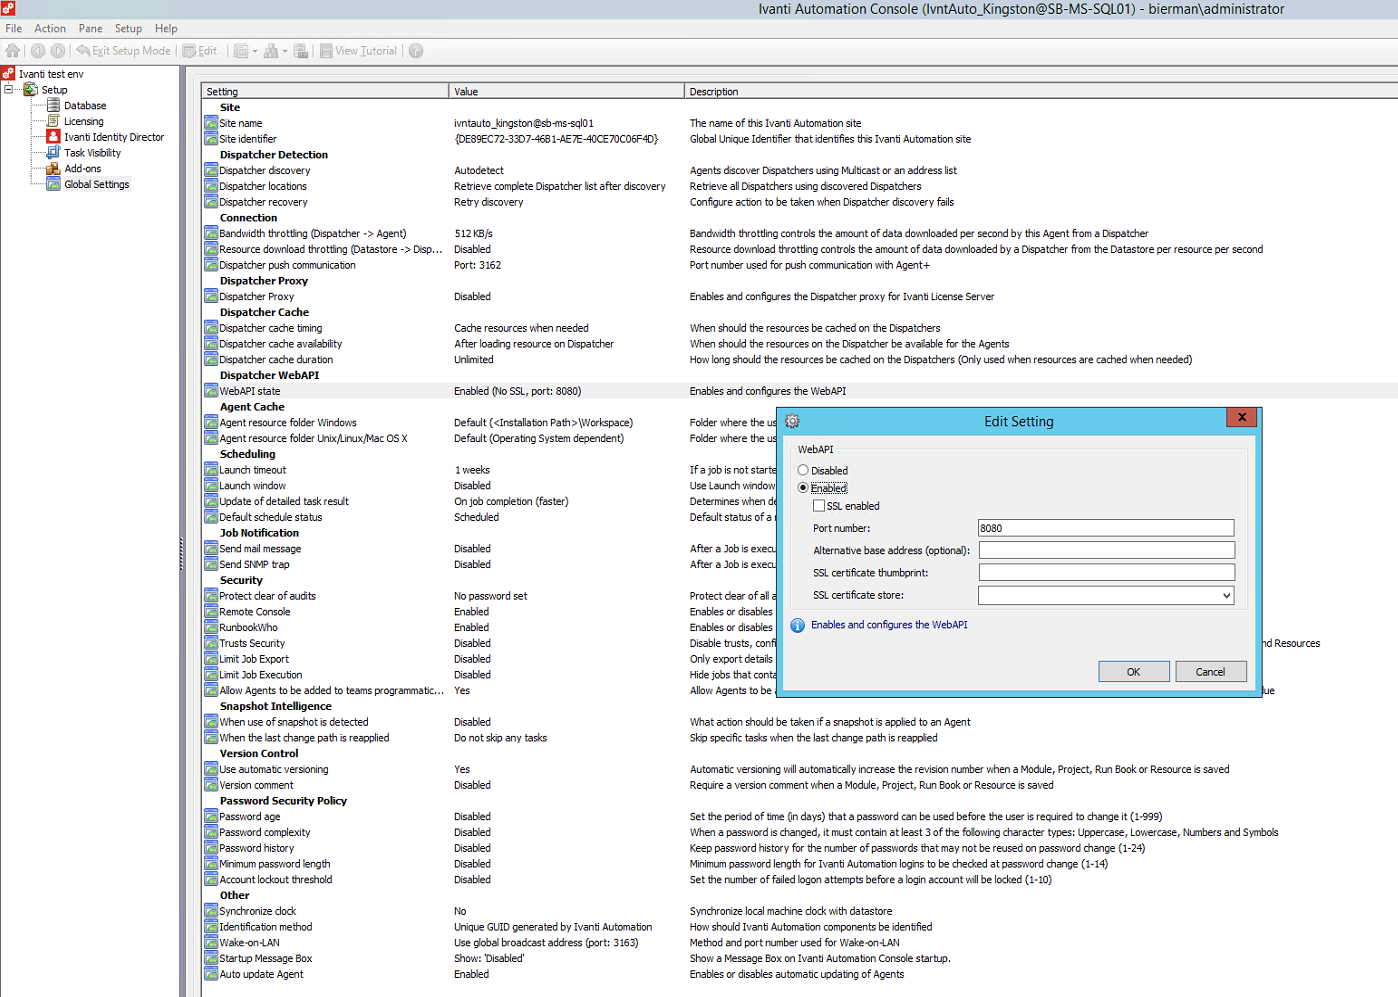
To establish the connection between Ivanti Service Manager and Ivanti Automation the WebAPI option in the Global Settings must be enabled and an Ivanti Automation Authentication account must be created.
Go to Setup in the top menu and select Global Settings.

Select the option WebAPI state from the settings list. Enable the setting and if needed change the port number. Change the port number to 8081 because 80, 443 and 8080 are probably used by Ivanti Automation and Ivanti Identity Director. In this document the SSL is not used.
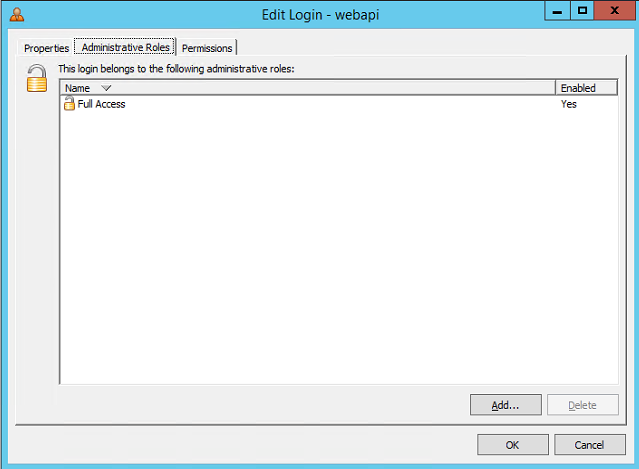
Exit the Setup Mode in the top menu and go to Administration -> Security. A new account specific for the WebAPI needs to be created.
Select New in the top menu and create a new Ivanti Automation Authentication account.
Add Login type the logonname -> webapi.
Make sure account type is Ivanti Automation Authentication.
Type twice a new password and select the option Do apply for global Password Security Policy.

In the Administrative tab add the Full Access role and continue.
All settings are configured in Automation to communicate from Ivanti Service Manager to Ivanti Automation.
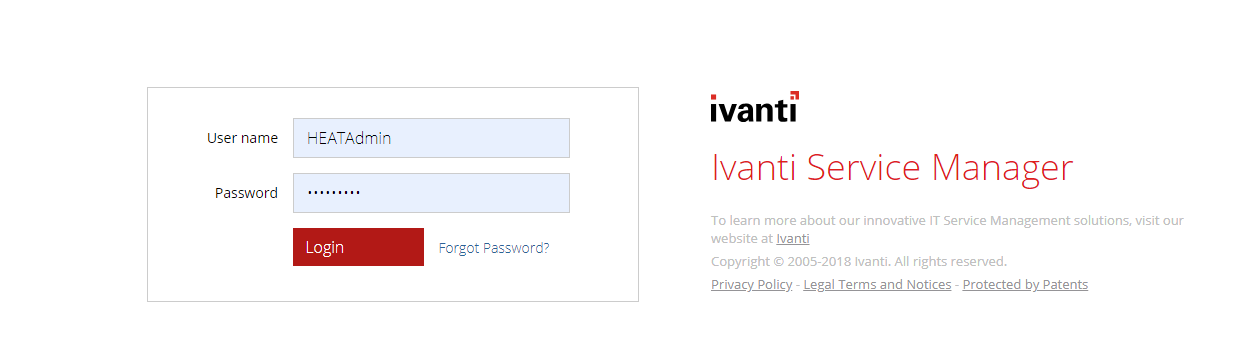
The next step is to build the integration in Ivanti Service Manager.
Open the Ivanti Service Manager website and login with a Admin account.
In the top menu select the option More… and select the option Ivanti Automation Configuration.
Configure the settings as below, where:
Host is the FQDN of the server and port number. Because it’s web based don’t forget to use http.
For example -> http://<fqdn of the dispatcher server>:<port number>
Username and password are the created Webapi account and password in Automation console.
Leave the Authentication Type on Basic and the Primary Host selected.
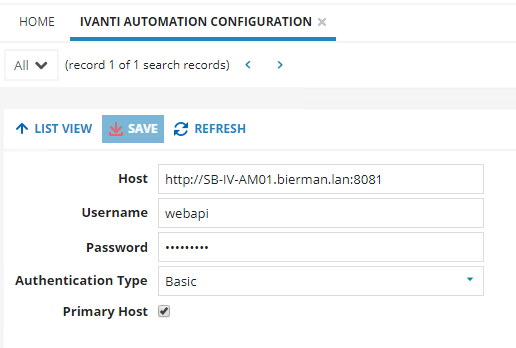
Select the Save button and continue by selecting the tool icon on the top of the page.
![]()

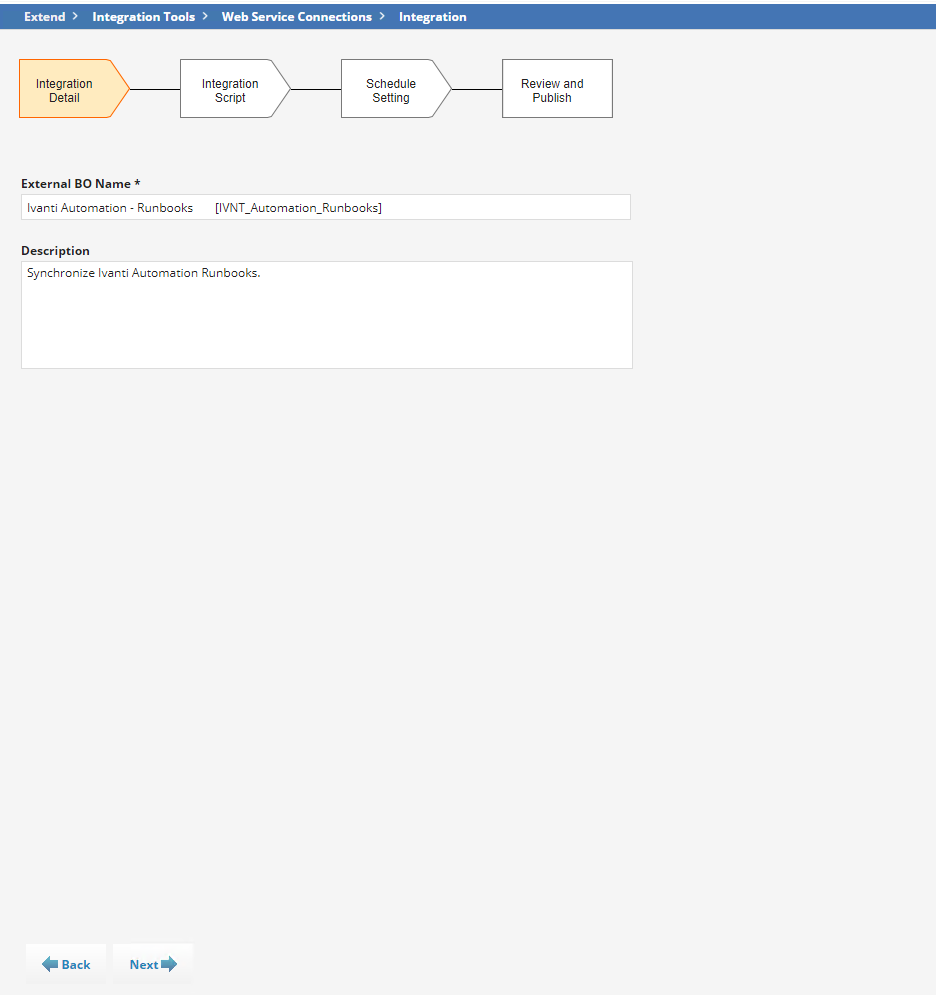
A new tab is opened and shows the Ivanti Service Manager Settings page. Expand the Integration Tools menu in the left menu. And select the Web Service Connections item.
Scroll down in the right and search for the IVNT_Automation_Runbooks Integration.
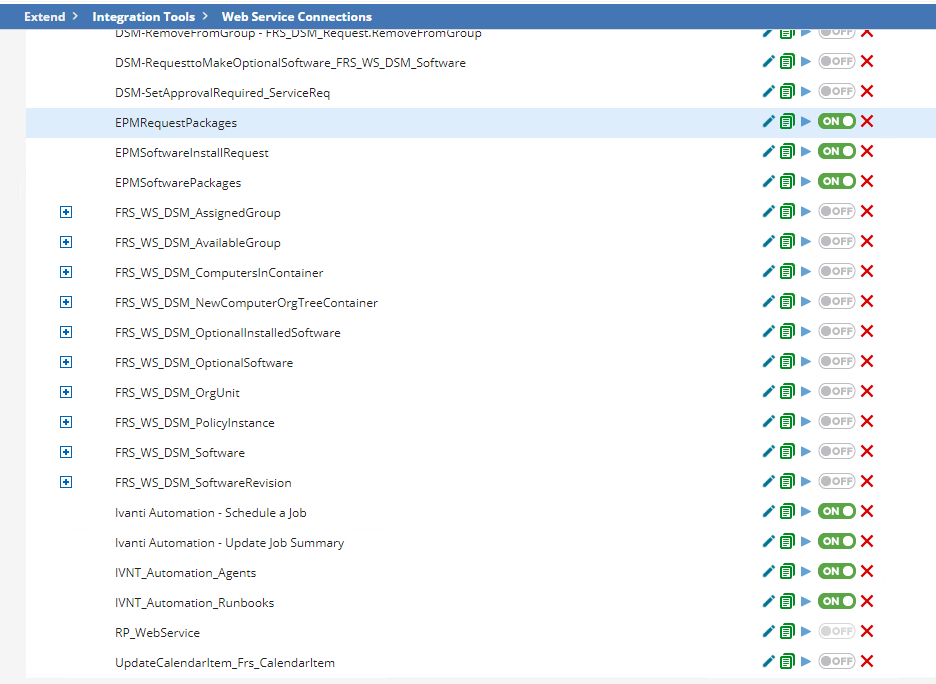
Select the pencil button to step through the integration settings and publish and run the integration to resolve all Runbooks available.
There is no need to change the configuration but at the end the integration must be executed to resolve the Runbooks from Ivanti Automation.
Select Next to continue.
Select Next to continue
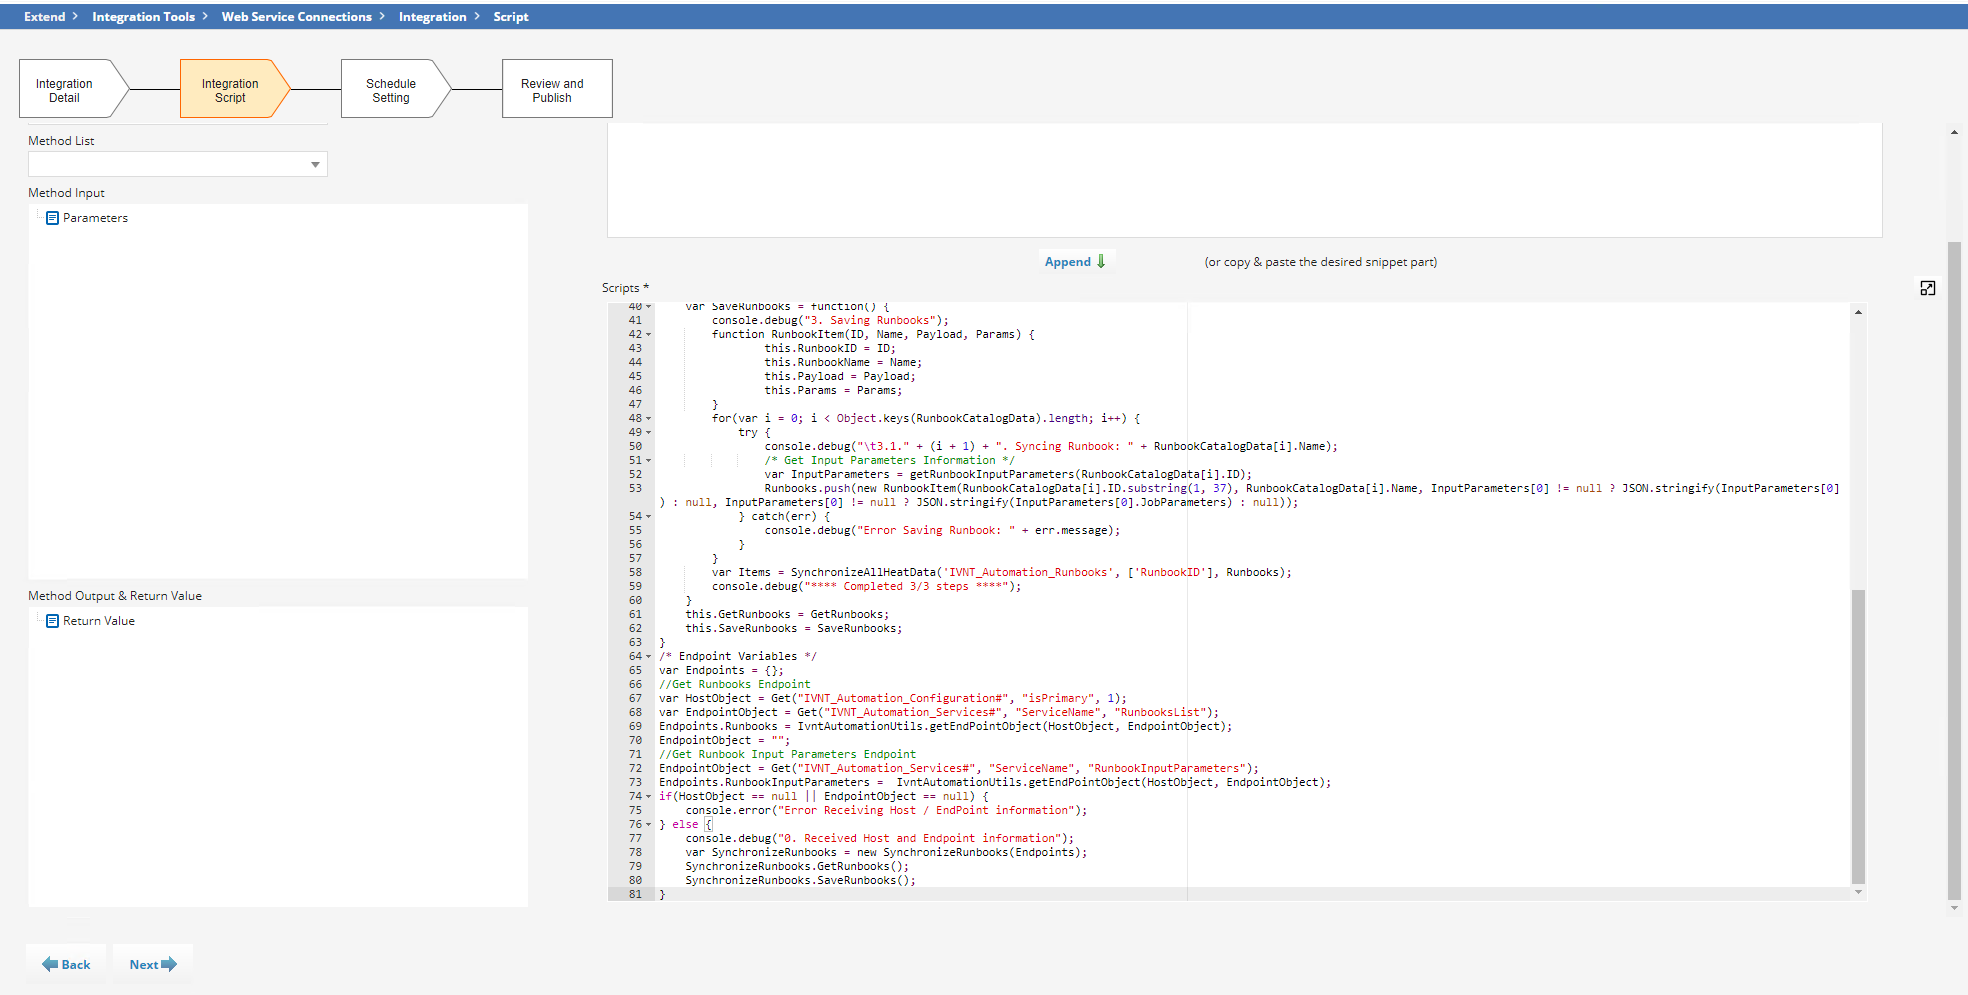
The screen shows the schedule to retrieve the Runbooks on daily base. Select Next to continue.

In the screen below select the option Publish & Run now to execute the integration action to retrieve the Runbooks.
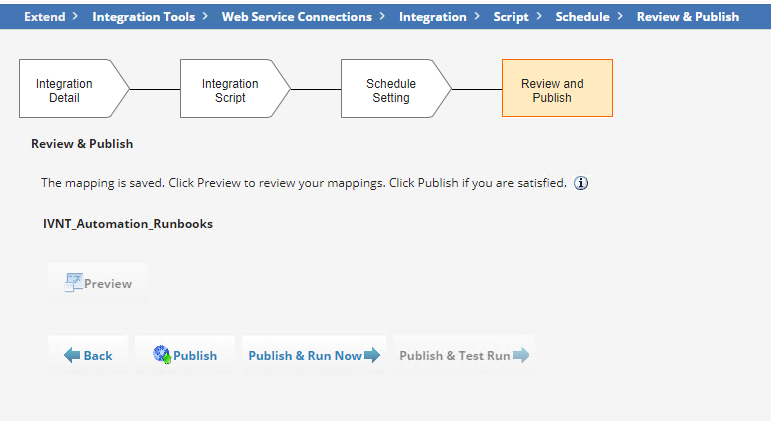
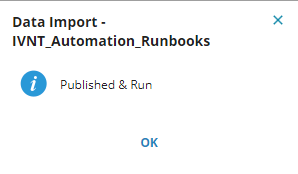
After executing Publish & Run now select OK in the popup box to start the job.
To check if the integration action was successful we go back to the Ivanti Service Manager website.
In the menu bar select the option More.
Select the option Integration Log to check if the integration succeeded.
The Integration Log shows in the integration job executed correct or failed.
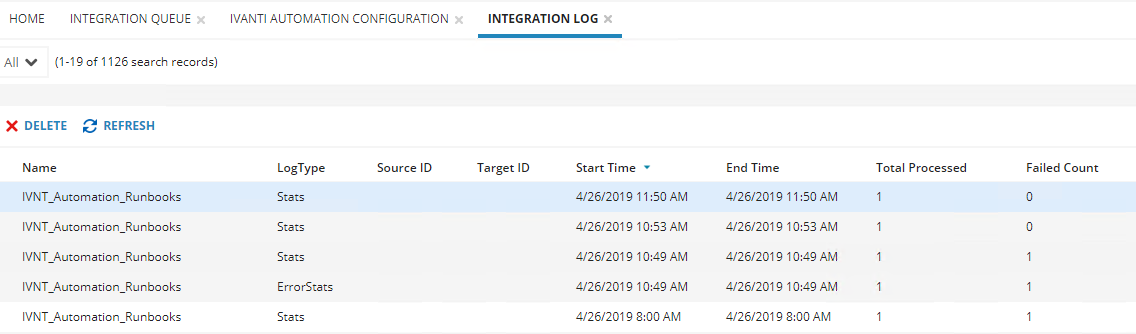
The log shows a failed integration job and 2 succeeded integration jobs.
Because we haven’t created any Runbook yet no Runbooks are imported. First step is to define a Service Request with the Automation action needed. In this document we discuss the option to reset a password for an Active Directory User.
Before we can create a Runbook we need create a Module and Variables with the tasks needed.
The first step we execute in Ivanti Automation is creating 3 variables which makes it easier to use those more often in other tasks in the future.
The task we are going to use needs connection to Active Directory and uses the Domain name, Security Context and Domain Controller information. When using more Active Directory related tasks we need these 3 values more often.
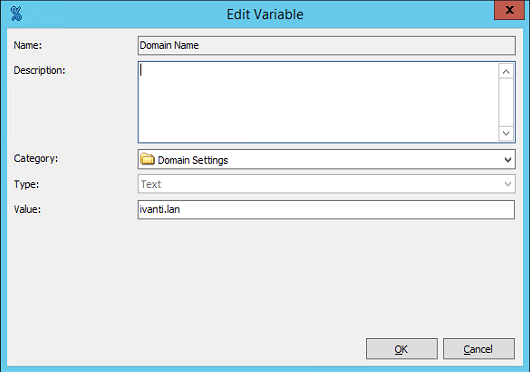
Go to Library -> Variables and create new category with the name Domain Settings.
Click right mouse on the new created category and select New.
First variable is the Domain Name (value is for example ivanti.lan)
 .
.
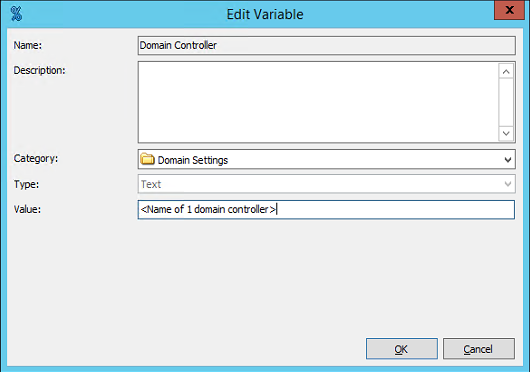
Second variable is the Domain Controller (hostname of one of the domain controllers)
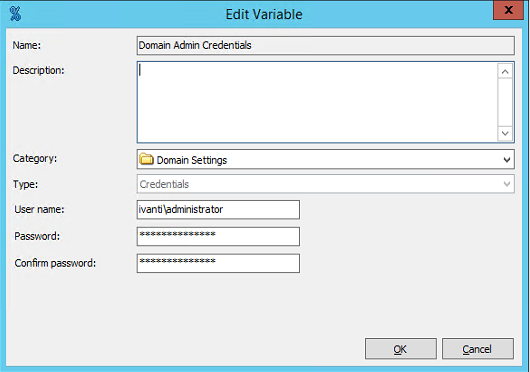
Third variable is the Domain Admin Credentials (Domain Admin account for example). Because we use credentials change the type of the variable to Credentials.
Enter the full Windows User Account and enter twice the password.
The fun part of this option when somebody needs to create new tasks the need of a Domain Admin password is not needed because the use of the variable is enough.
Now the three variables are created go to Library -> Modules.
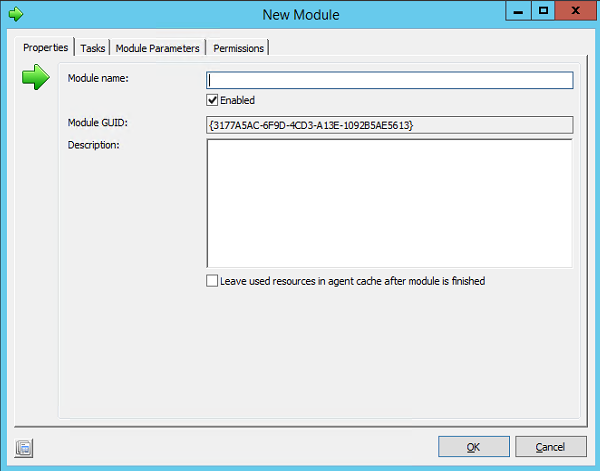
Right mouse click on the ISM Requests folder and select New. Name the Module Reset AD Password for user.
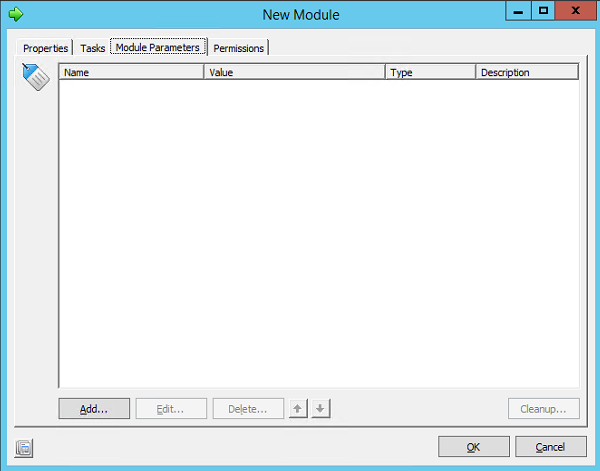
Move to the Module Parameters tab and create two new parameters. Follow the steps below to create the following parameters:
- Logonname
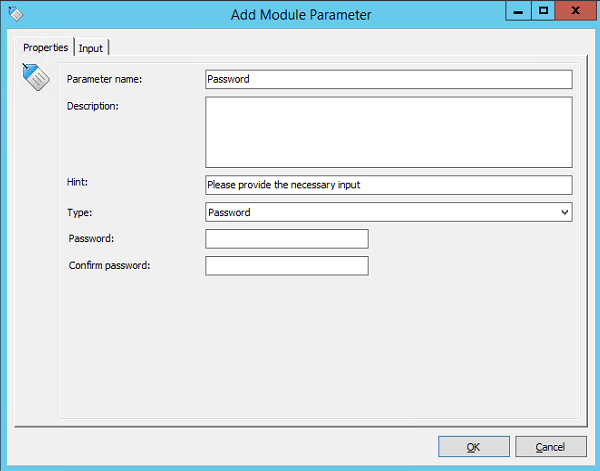
- Password
Note: Both values need to be empty because the values are entered in Ivanti Service Manager.
Select Add to create a new parameter. Give the parameter name Logonname.
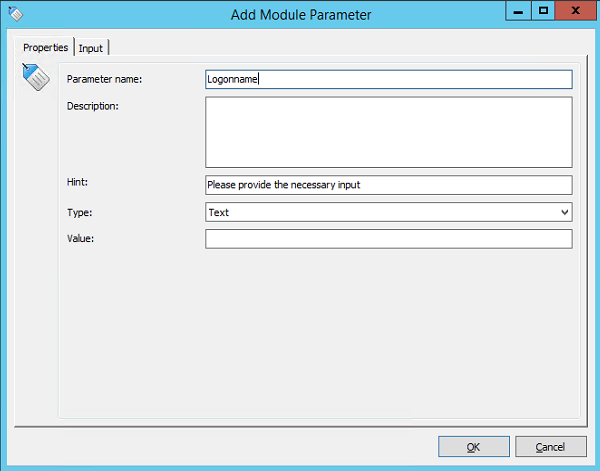
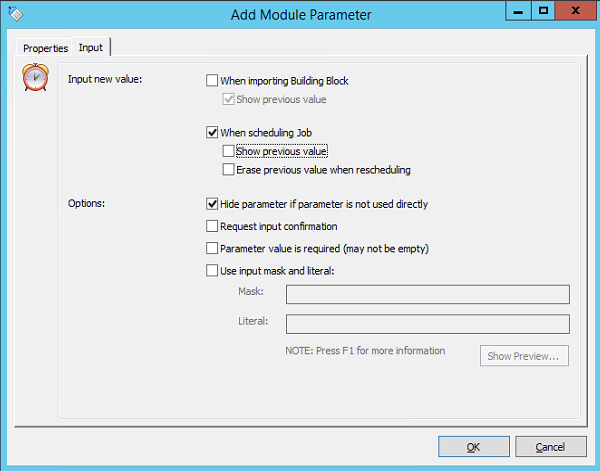
Move to the Input tab and remove the selection at Show previous value under When scheduling job.
Select OK and select Add to create the second parameter.
Because this is the Password parameter make sure the Parameter type is set to Password.
And in the Input tab remove the Show previous value selection.

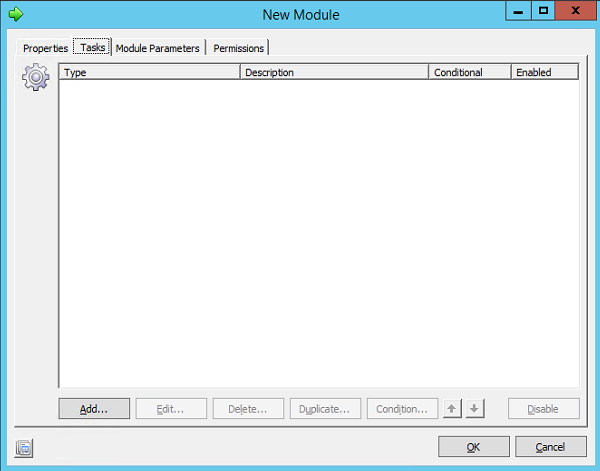
Next step is creating the task to change the password for the user. Go to the Tasks tab and select Add.
We provide many different tasks and the Instant Search makes it easier to look for the task we need.
Type User in the Instant Search box.
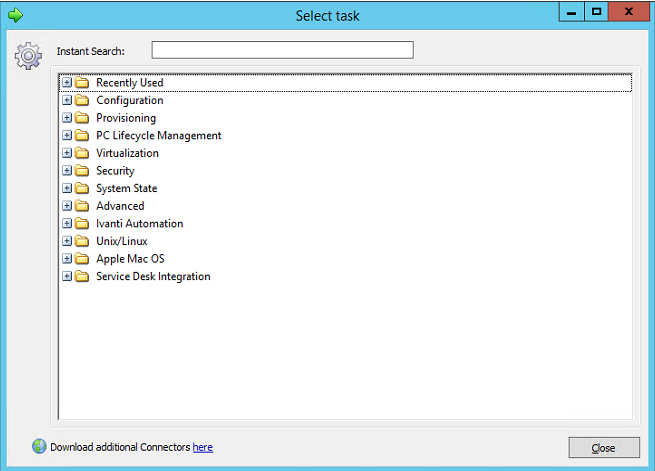
After the search the list provides only tasks related to User.
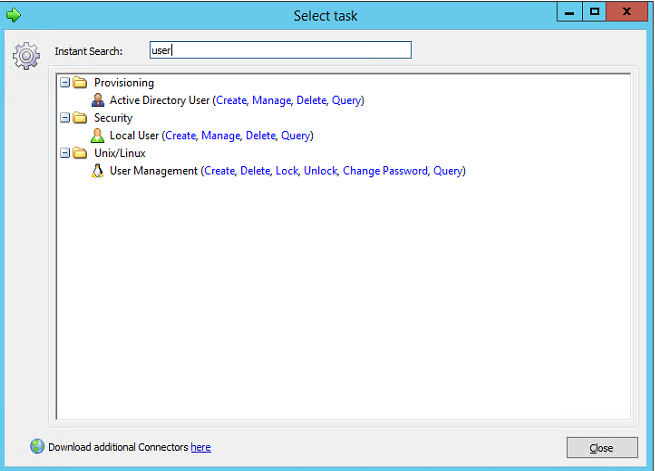
One task can have multiple actions. In the Provisioning we see the Active Directory User task with 4 options. Every option is a different task.
In this example we select the Manage action because changing a password is managing a user account in Active Directory.
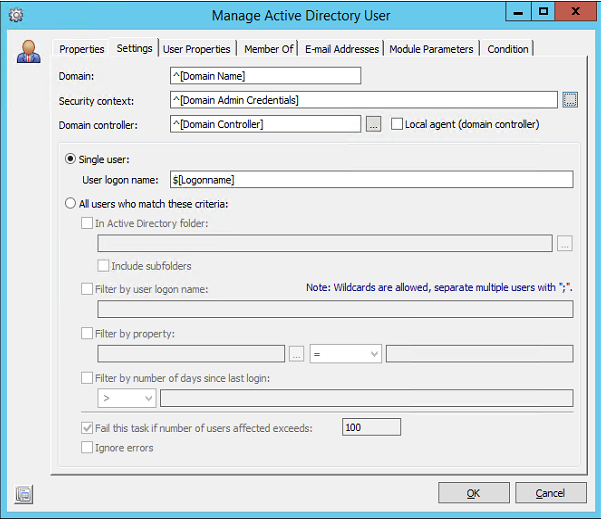
In the next screen we can add the created variables to the Domain/Security Context/Domain Controller fields.
Select the input field behind Domain and right mouse click. In the menu move over the variables and all the variables created are shown. Select the corresponding variable.
For the Domain option select the variable ^[Domain Name].
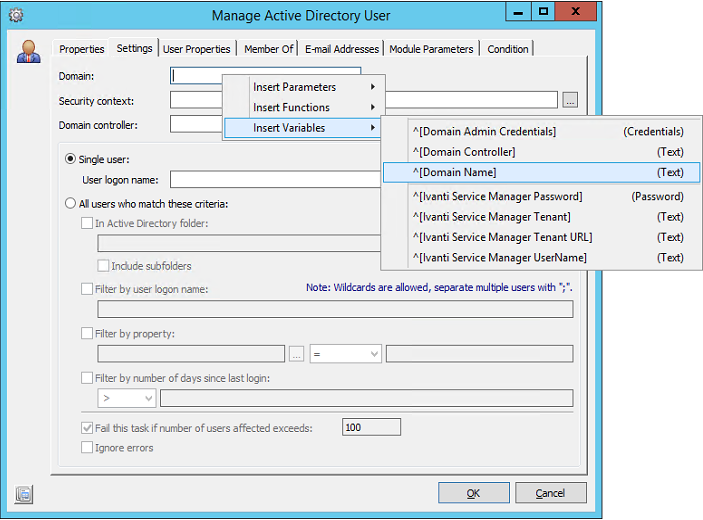
For the Security context we need to add the variable in the field behind the 3 dots icon. Because the right mouse click in the Security context field doesn’t show the variables.
After selecting the icon right mouse click in the first field and add the correct variable. In this example the variable ^[Domain Admins Credentials]. After selecting the credential variable both Username and password are filled.
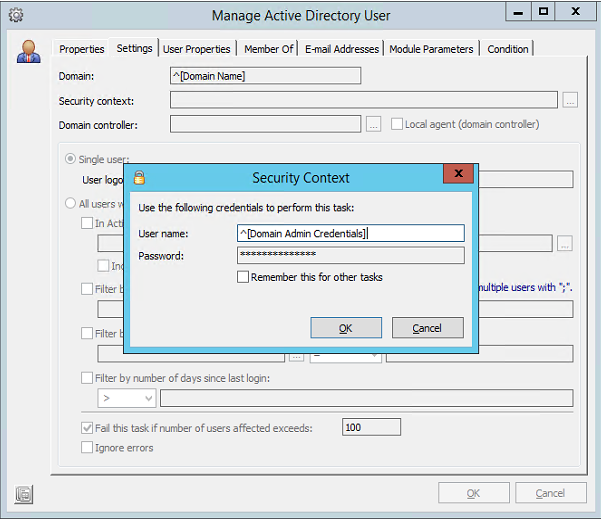
Select OK and add the variable for the Domain Controller (variable ^[Domain Controller].
When finished with the variables the three top fields look like screen below.
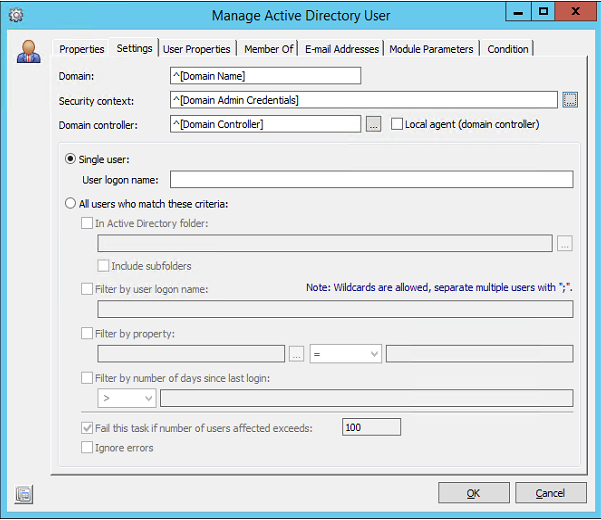
Because we need to search for the user in Active Directory and the Username is provide by Ivanti Service Manager we created the Logonname parameter. With the same action as the variables we can add the Logonname parameter to the option User Logon Name under Single User.
When finished the Settings tabs has the settings filled like below screen.
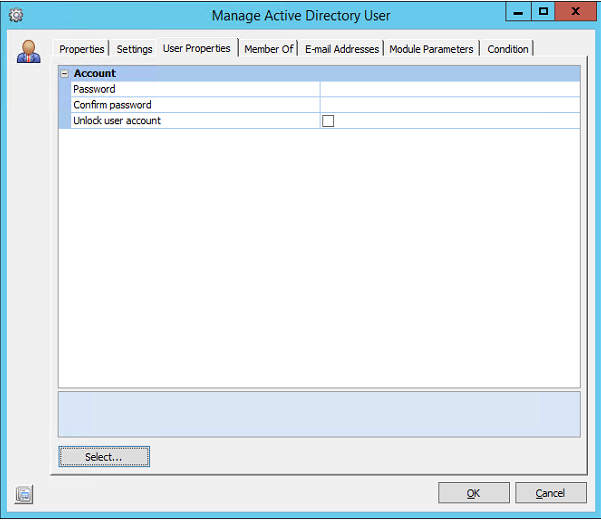
Go to the User Properties tab. In this tab we need to add the User Properties from Active Directory and add the Password attribute from Active Directory to reset the password.
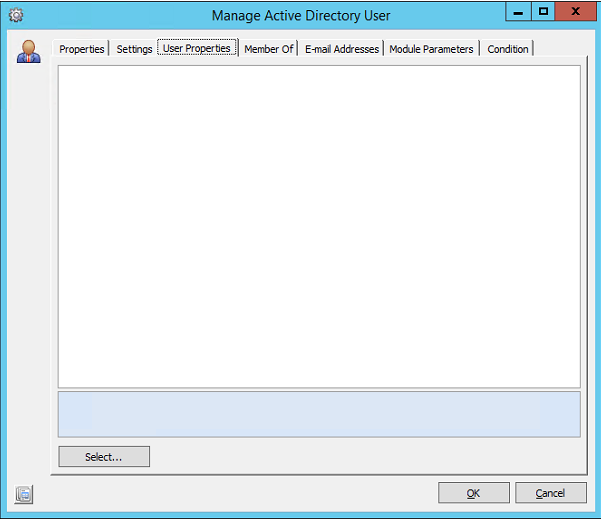
Click on the Select button to add the Active Directory properties.
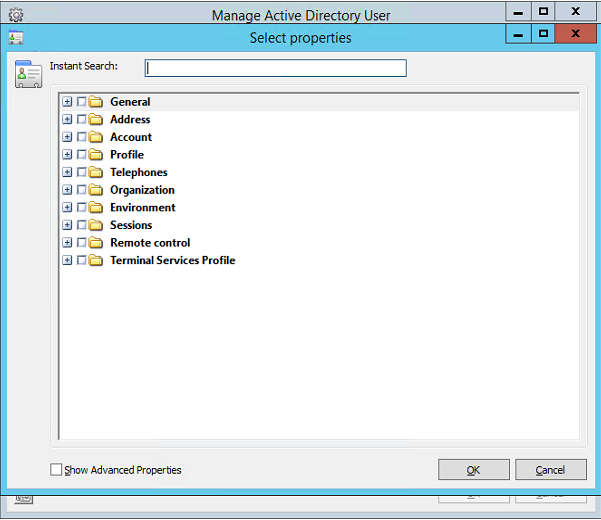
With the use of the Show Advanced Properties all Active Directory properties are available.
For the Reset Password task there is no need to open the Advanced Properties.
Because the password is under the Account option in Active Directory open the Account option and select the Password value. Because a user account which needs a password reset is mostly locked.
I always add the value Unlock User too.
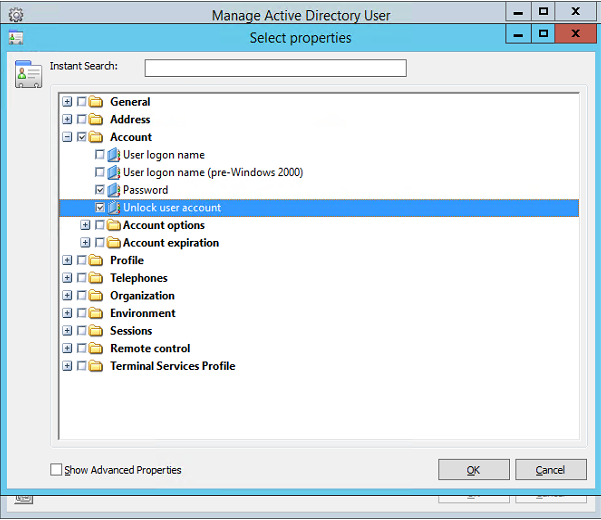
Select OK and the two Active Directory properties are added to the task.
Add the password parameter to the first password option by right click in the password field and select the Password parameter. The second field is not needed because the password is set twice during the execution of the task.
Make sure the Unlock User Account is enabled.
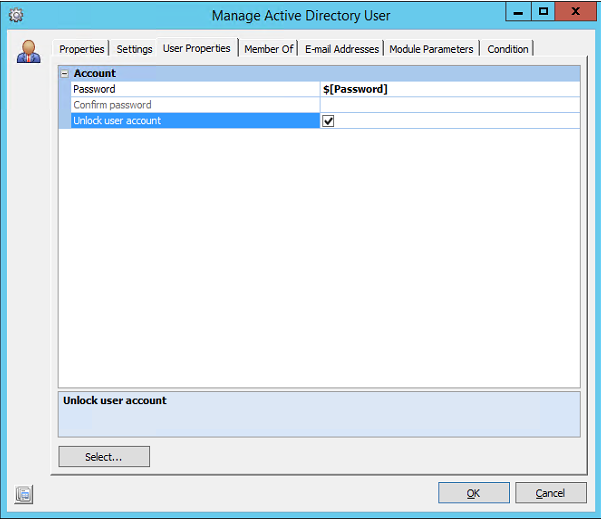
Select OK and following warning appears.

This warning is showing because one field is empty but is not needed. Select OK to continue. Select OK again and the new Module to reset an Active Directory password is created.
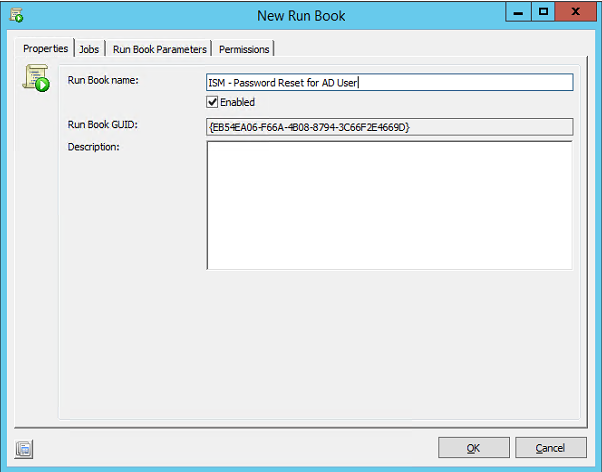
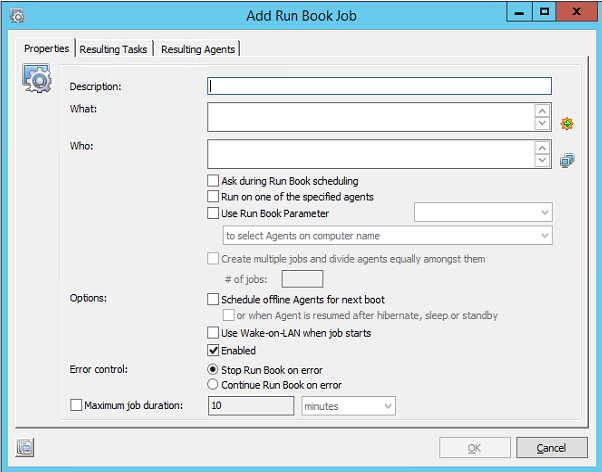
When the Module is created a Runbook needs to be created. Go to Library – Runbook and create a new folder. Name the folder ISM Integrations.
Select New to start creating a new Runbook for the Reset Password action.
Give the Runbook a name like screen below.
Go to the Jobs tab to select the Modules needed.
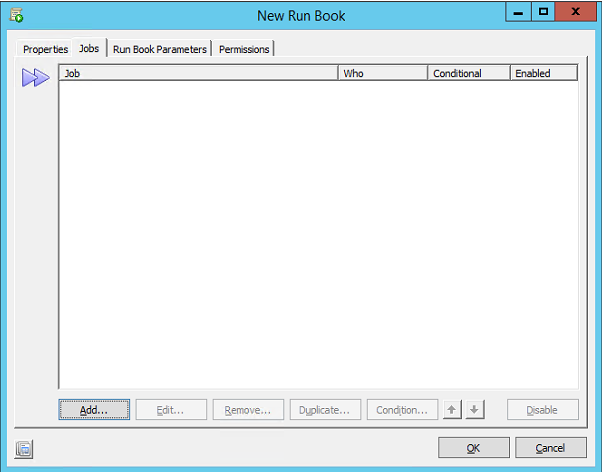
Select Add.
The screen below shows many fields but the first step is select the Module in the What option.
Click on the white filed behind What a new screen appears with 2 tabs (Projects and Modules). When there are now Projects and only Modules created the Modules tab is shown.
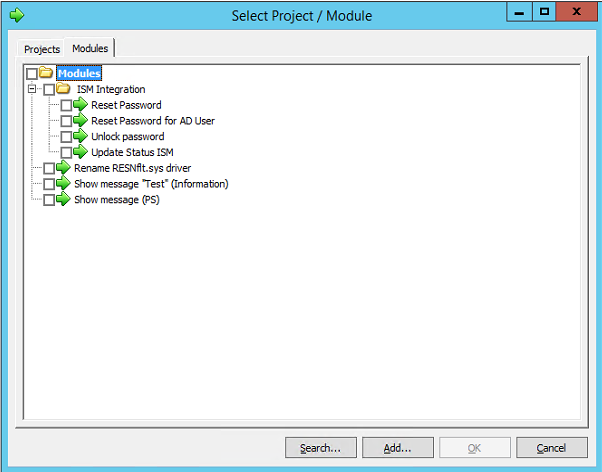
Open the ISM Integrations folder and select the module just created. In this example we select the Reset Password for AD User.
After selecting the module and selecting Ok the module is shown in the What field.
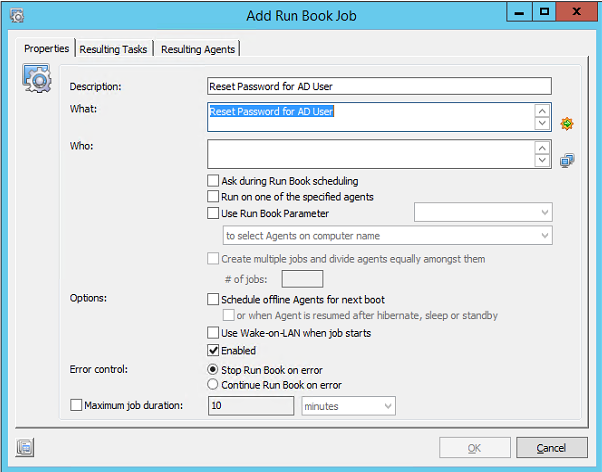
Next step is to provide a standard agent to execute the Runbook on. Because we execute an Active Directory action install an Automation Agent on a Domain Controller or install the Active Management tools on a management server and install the Automation Agent on this server.
In this document only 1 agent is available and installed on the Domain Controller.
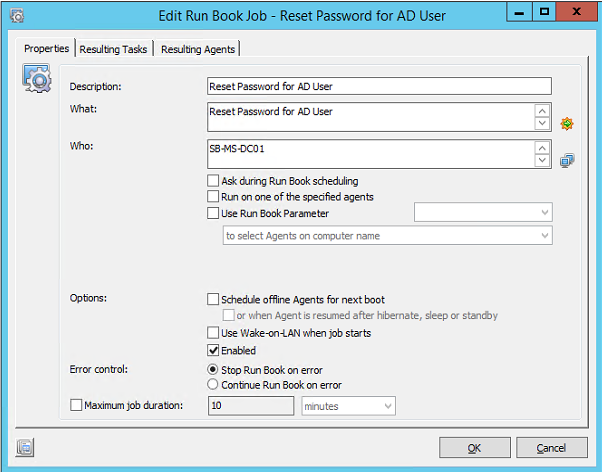
Select OK to add the Module to the Runbook.
Next step is adding the Ivanti Service Manager Integration module we created earlier.
Select Add to select the Update Status ISM module.
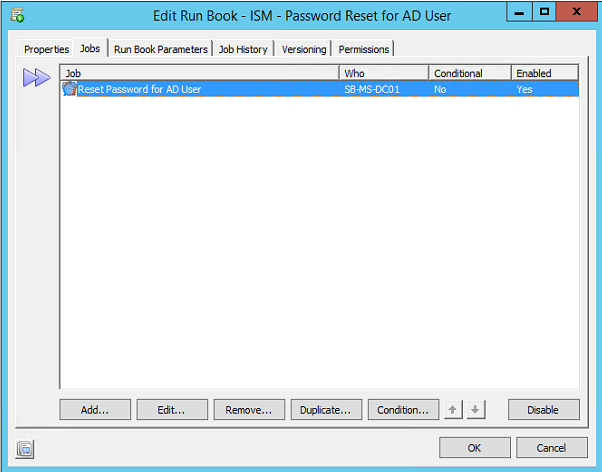
Select the module from the module list after you select the What option and add the agent to the Who field.
When finished the configuration looks like below.
Select OK and the 2 modules needed are added to the Runbook.
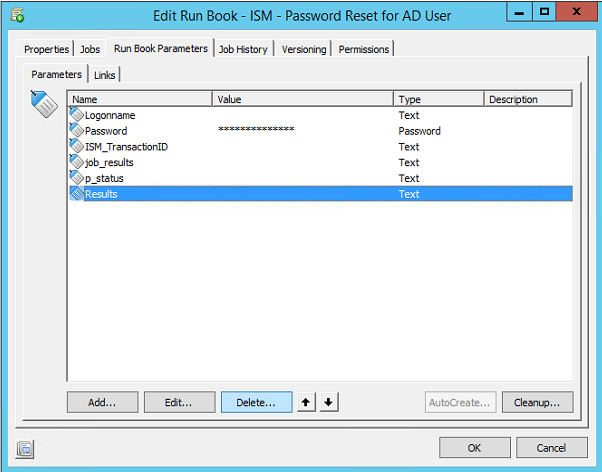
Next step is adding the parameters we created in both modules.
Select the tab Run Book Parameters and select the button AutoCreate…. This will add the parameters from both added modules. During the AutoCreate option a popup asks to AutoLink the parameters.
Select Yes to continue.
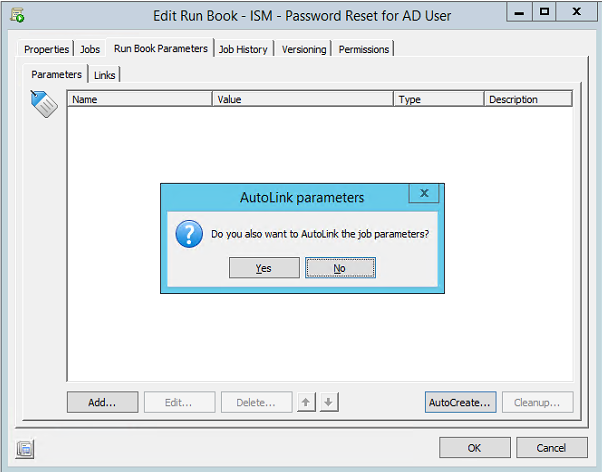
The Links tab is for not relevant in this example. After selecting Yes the parameters are added.
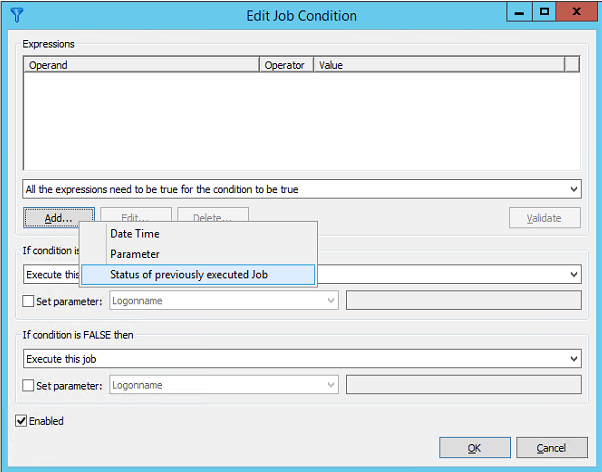
Select the Jobs tab again and only select the Update Status ISM Module. Don’t double-click just select. When the module is blue shaded select the Condition button. The condition is make sure the p_result parameter is filled with the Completion or Failed status and return this to Ivanti Service Manager.
Select the Add button to create a new expression. From the list select the option Status of previous executed Job.
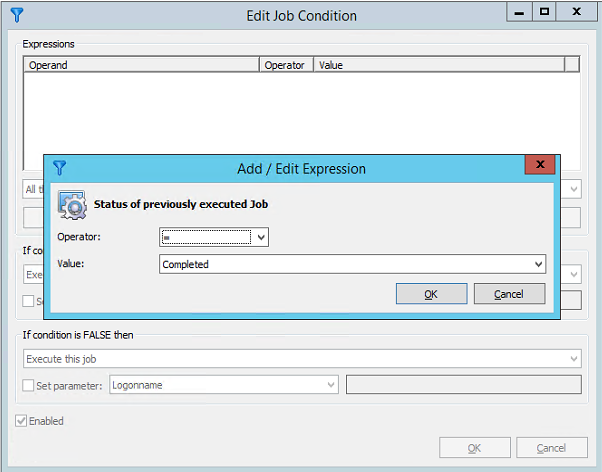
In the Add/Edit Expression the Operator needs to be = and the Valie Completed. Select OK to continue.
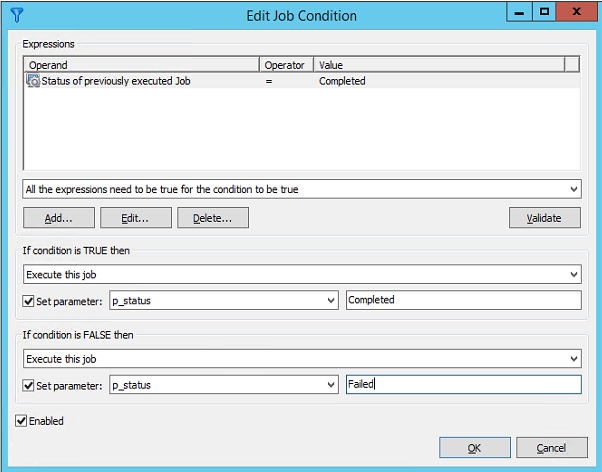
Make sure the If condition is TRUE/FALSE then actions are configured like below. When enabling the Set parameter option the p_status parameter can be chosen from the drop down list.
The values Completed and Failed must be typed.
When finished select OK twice and the RunBook is created.
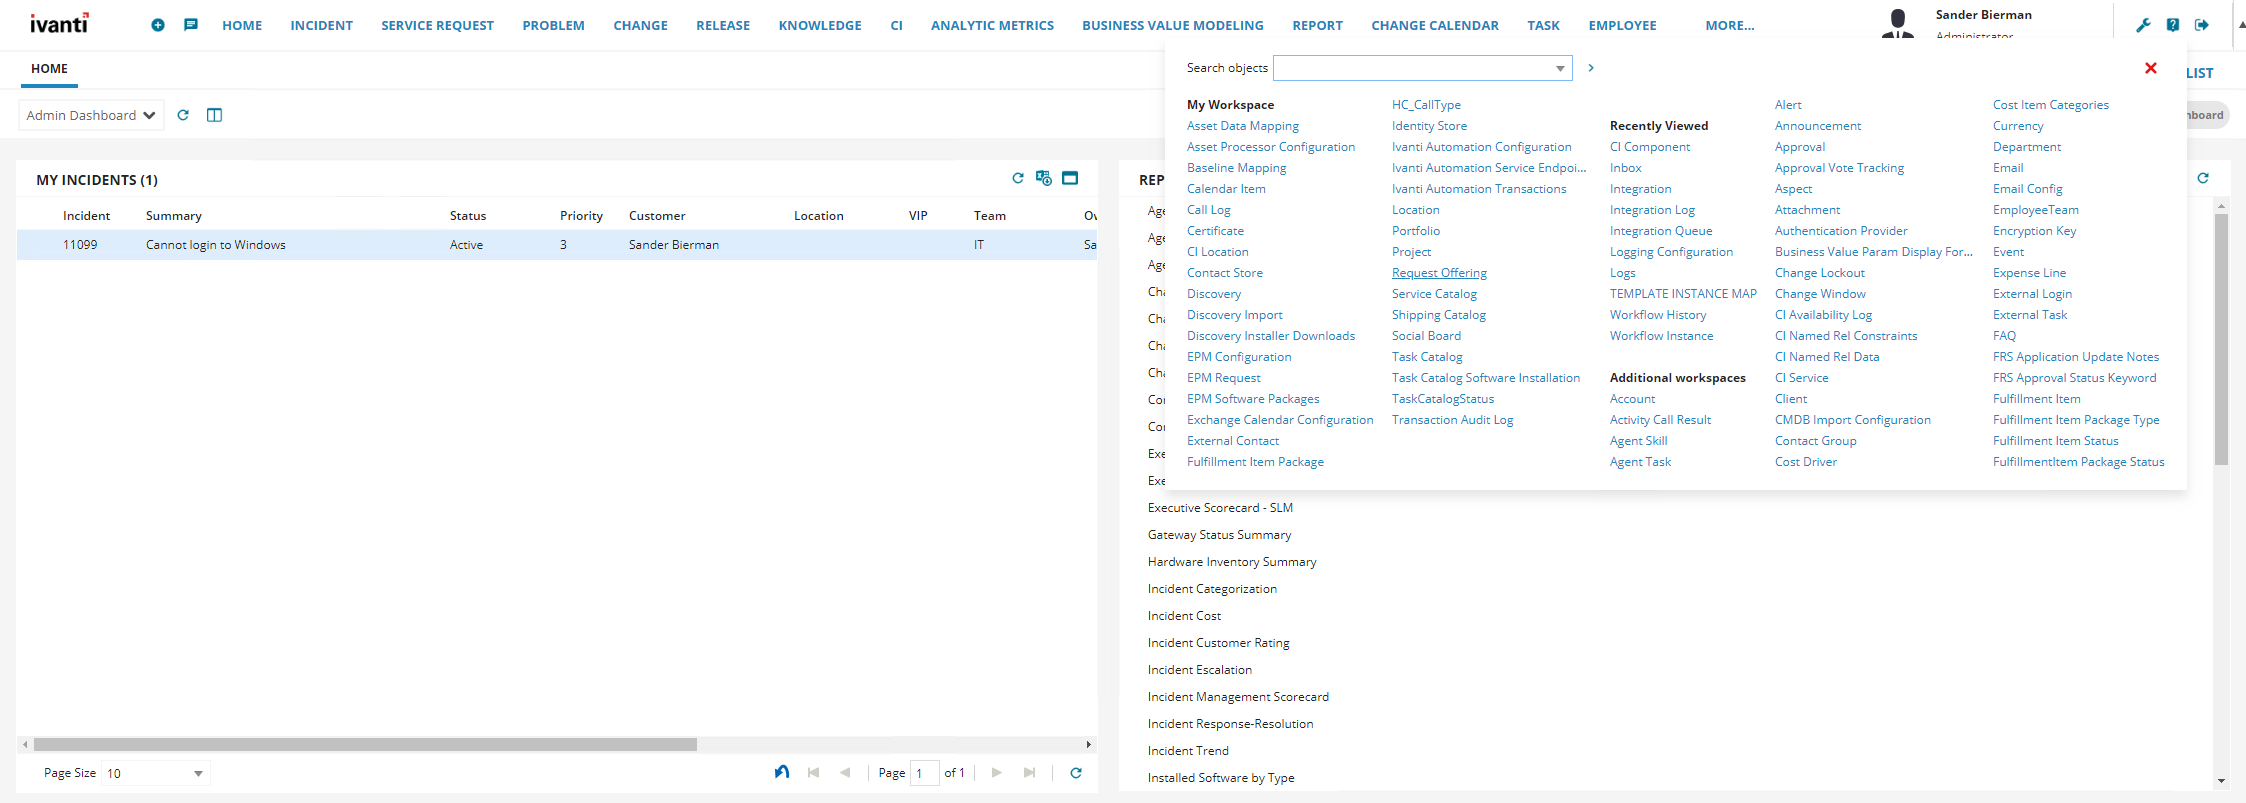
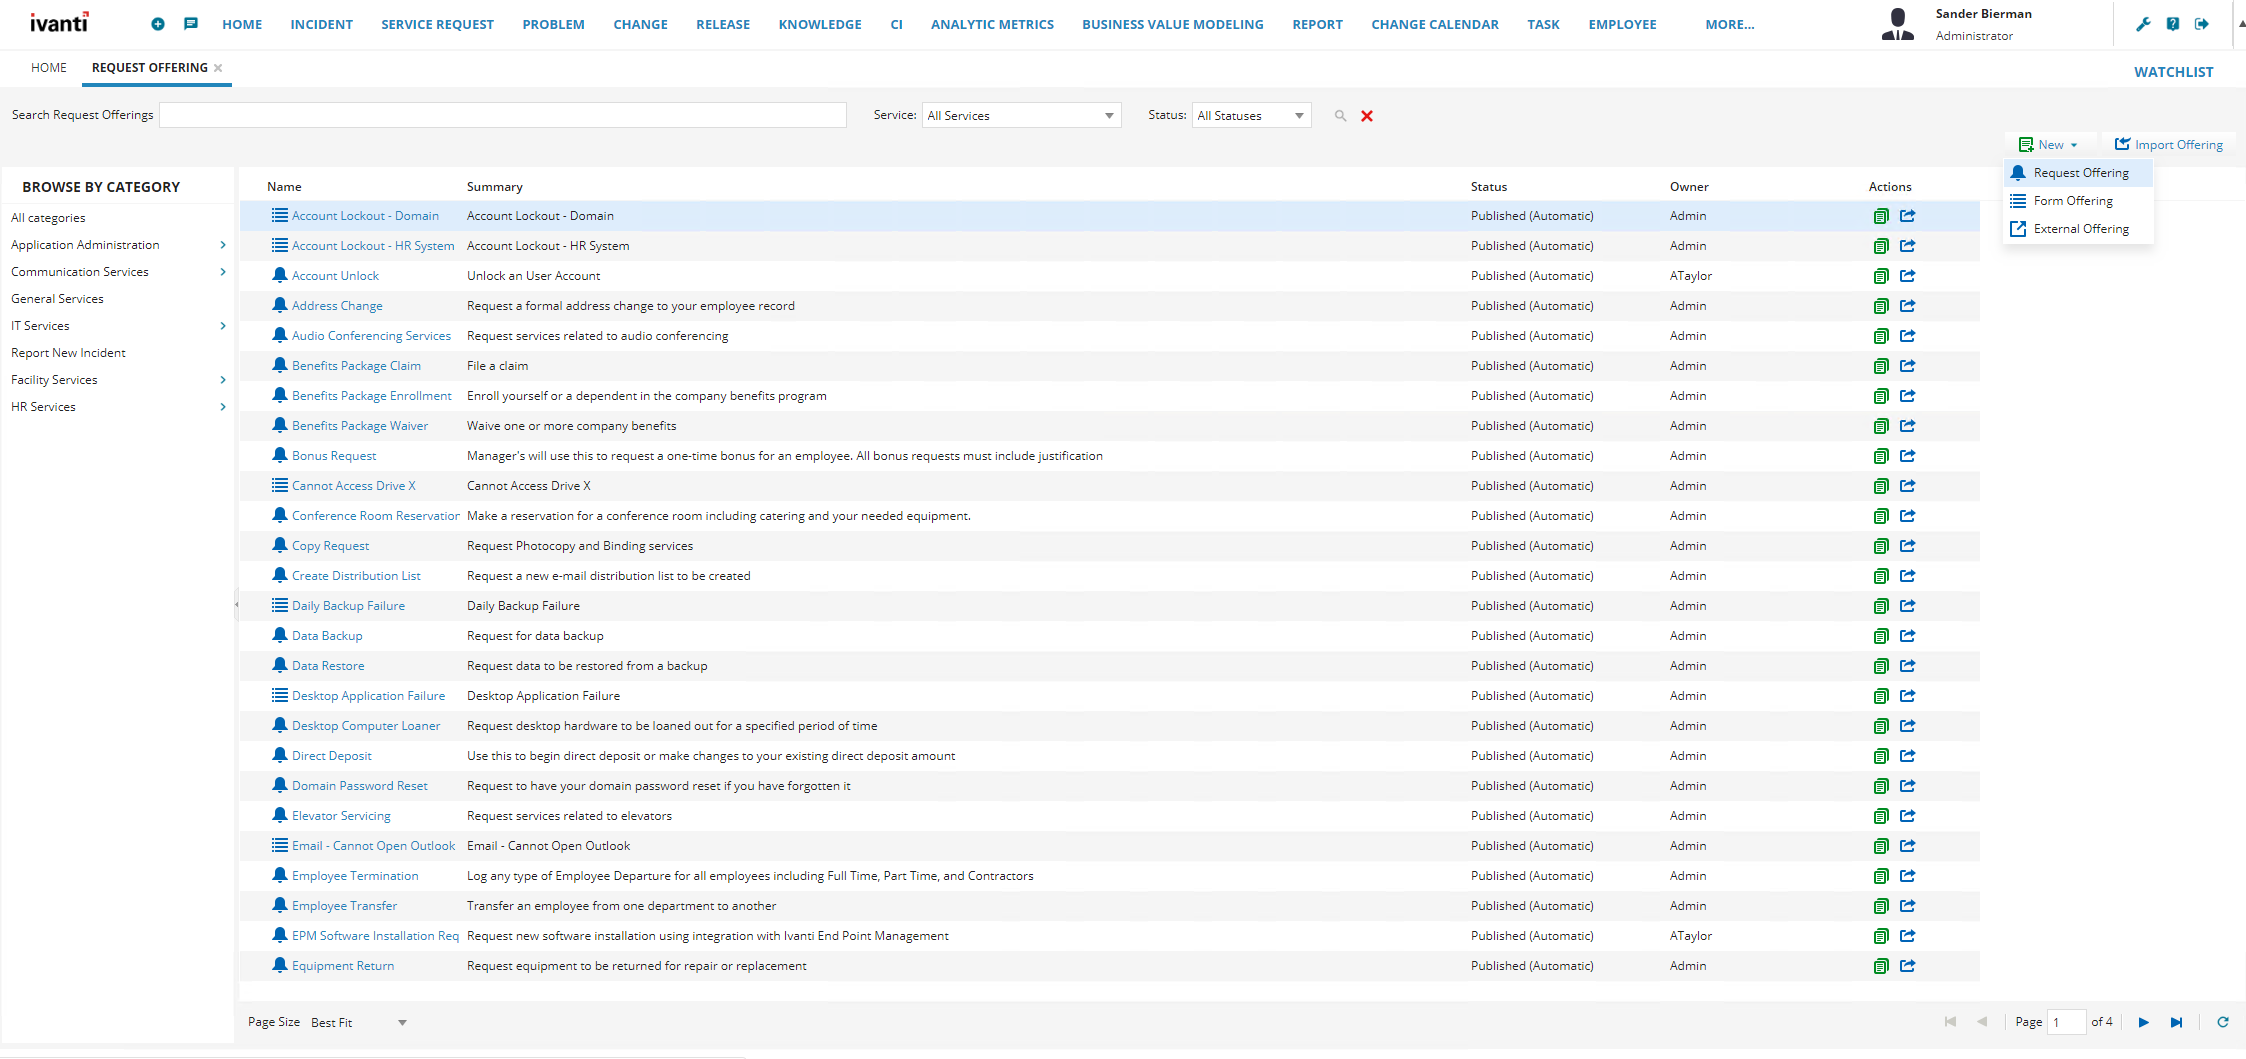
To finish the integration the last step is creating a Service Request in Ivanti Service Manager. Go back to the Ivanti Service Manager Management Portal and select More in the top menu and in the menu the option Request Offering.
On the right side of the page there is an option New. Select his option and the option Request Offering from this menu (see arrow in screenshot below).
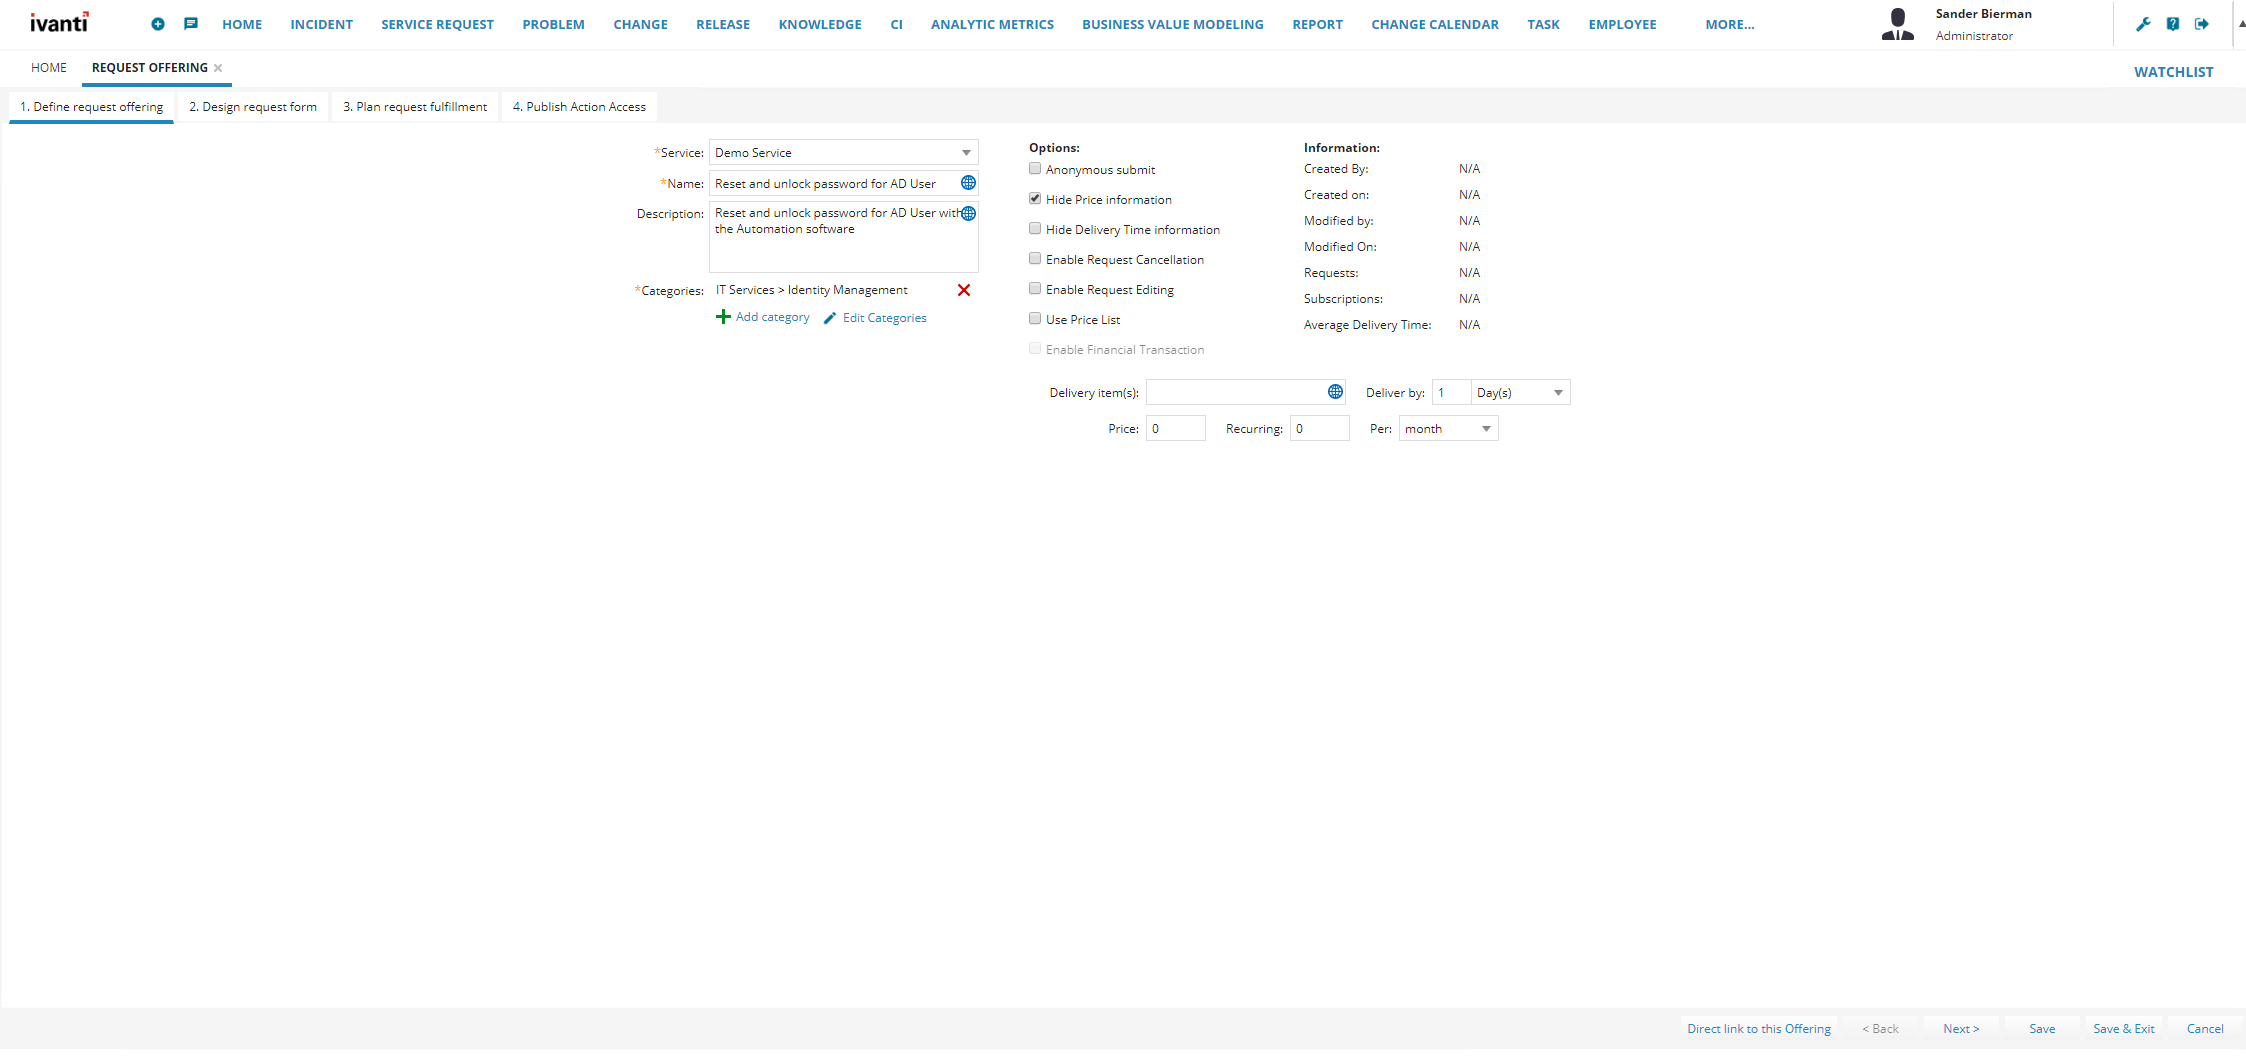
When creating a new Request Offering 4 tabs are available. In the first tab we need to define the following information:
- Service
- Name
- Description
- Categories
- Options (in this example not needed).
There are multiple pre-installed Services and for this demo I selected the Demo Service.
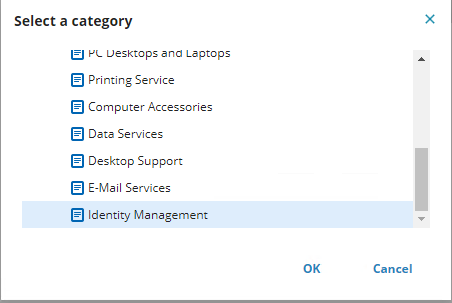
Add a name and description to the corresponding fields. Select the option Add category to add the new request in the correct category.
In this example added the Request to the IT Services -> Identity Management category.
When all settings are configured the first tab looks like screenshot below.
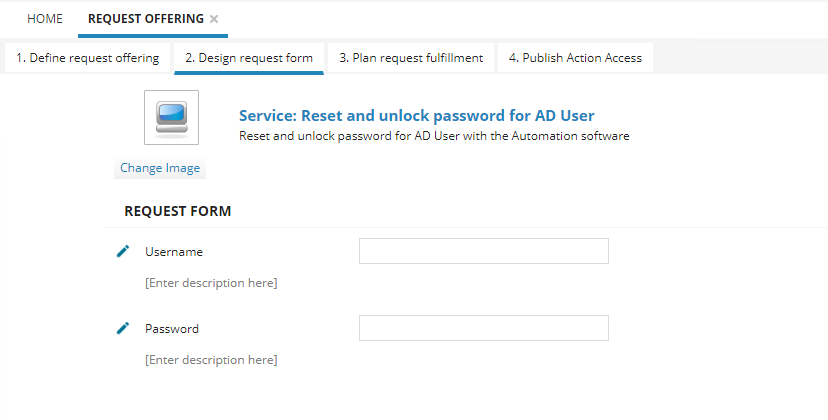
Select on the bottom the option Next to move to the second tab. In this tab we need to design the request form. Because users need to enter their Username (possible to resolve this from ISM) and enter a new password a form needs to be created which offers the input fields.
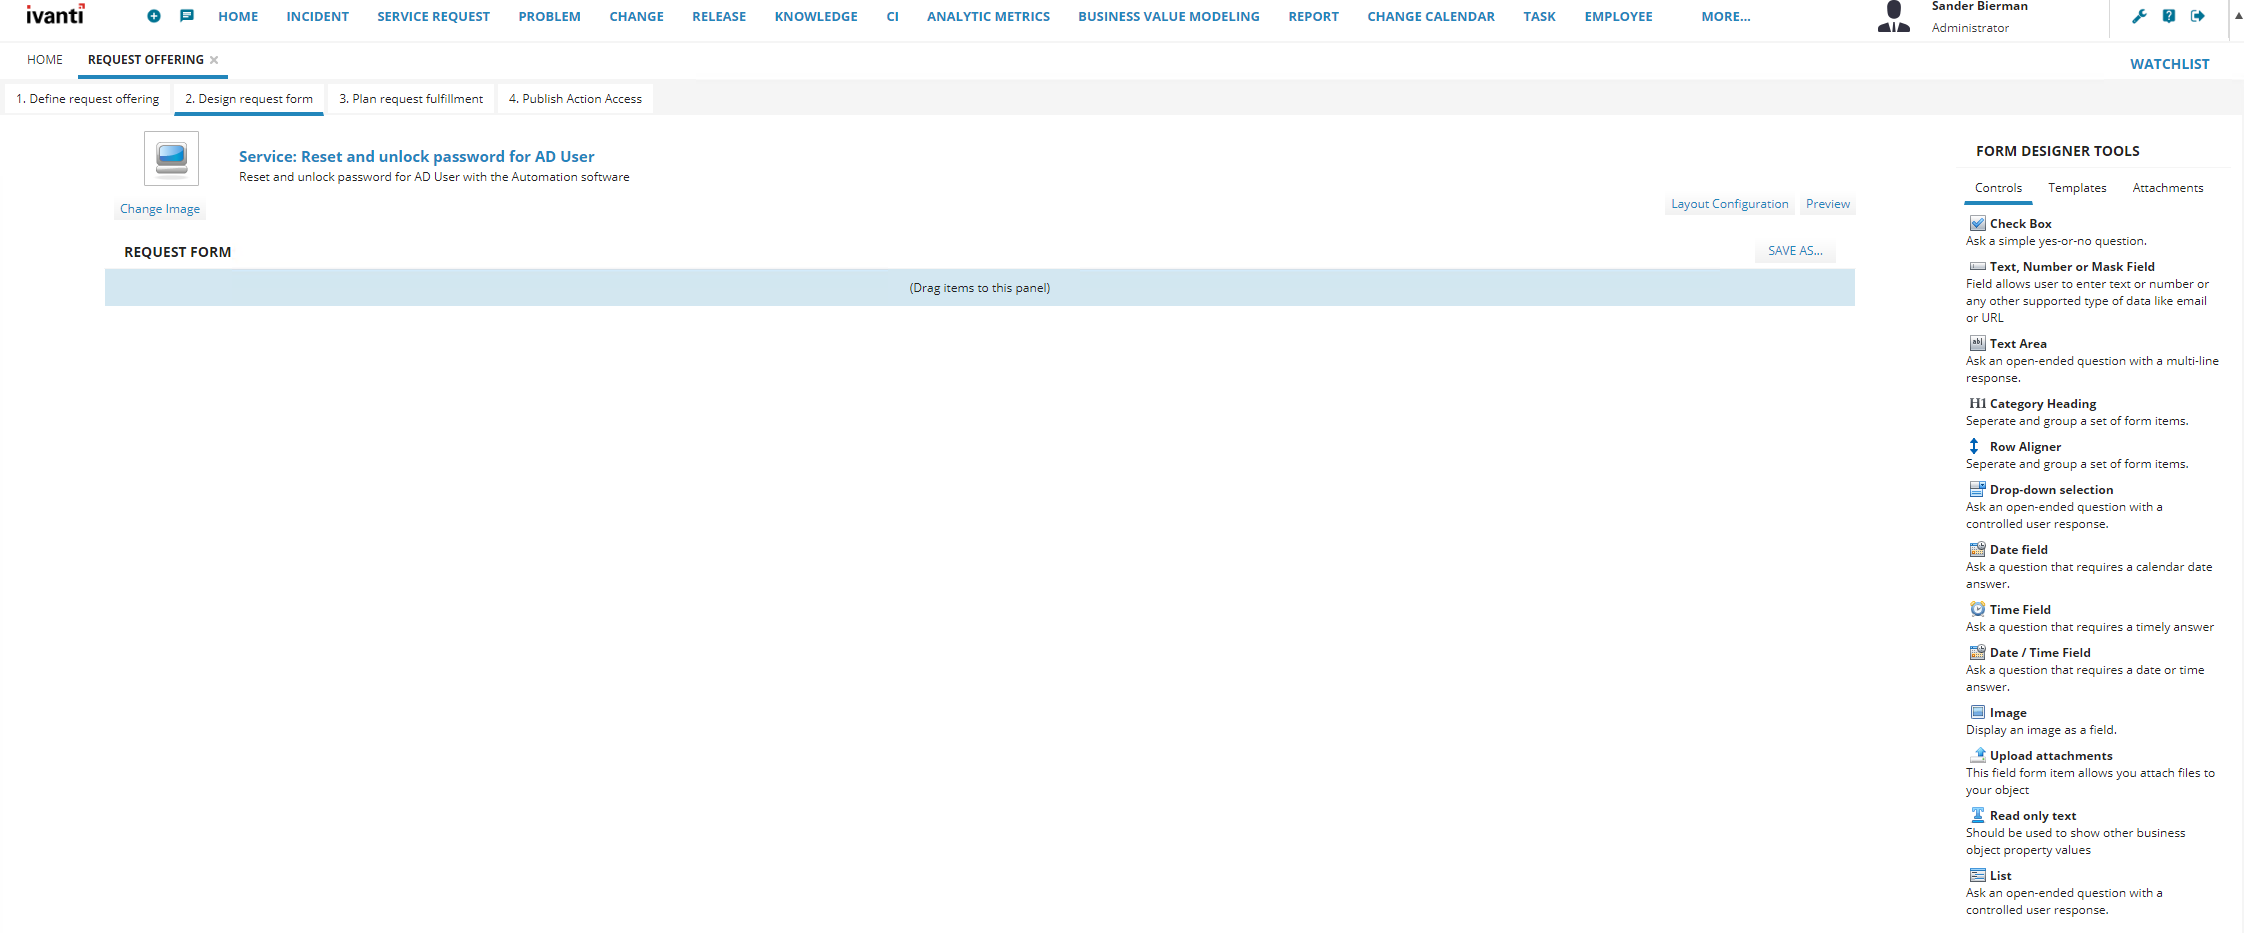
On the right side of the page the form designer tools are available. Because we need only to Test fields we use the Controls option.
Select the Text, Number or Mask Field and drag this to the blue panel. Execute this action again for the password field.
Change the name of the Text fields by clicking on the name.
First text field is Username and second text field in Password.
There are many other settings available but not discussed in this document.
When added the 2 text fields the configuration looks like screenshot below.
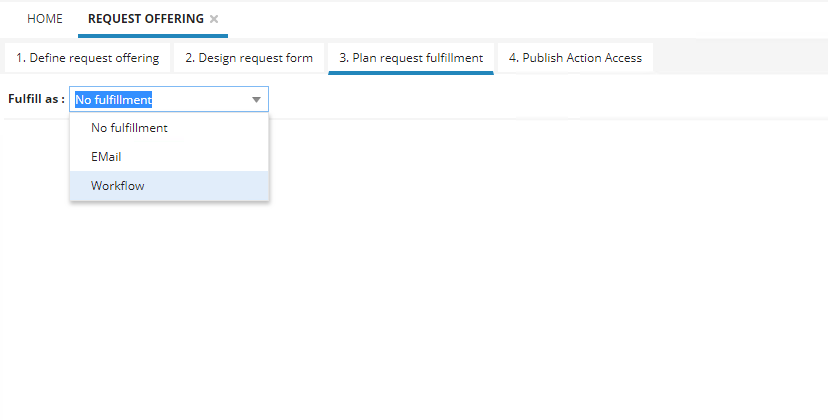
Select Next to continue to tab three (Plan request fulfillment). On this tab we need to create a workflow which creates a WebAPI and send the action to the Ivanti Automation Dispatcher to execute the Runbook with the parameters filled.
From the Fulfill as list select the option Workflow.
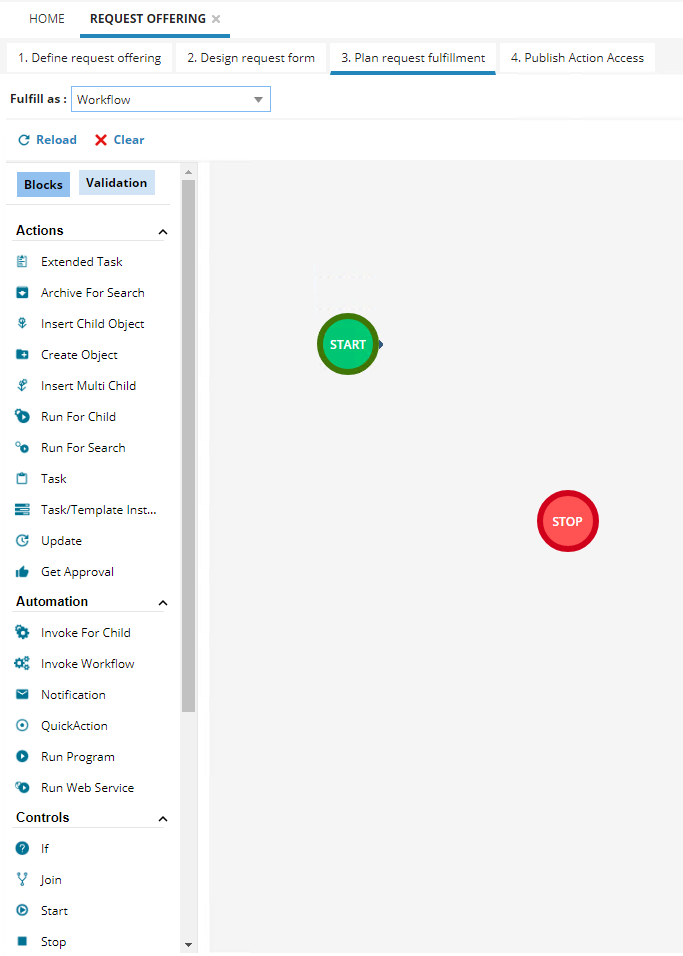
Every workflow has a Start and Stop which we need to add from the Controls on the left side of the page.
Drag the Start and Stop the right side of the page. The Start and Stop are now added to the Workflow.
Next step is adding the Ivanti Automation integration. Scroll down in the controls and select the Ivanti Automation option and drag this option to workflow.
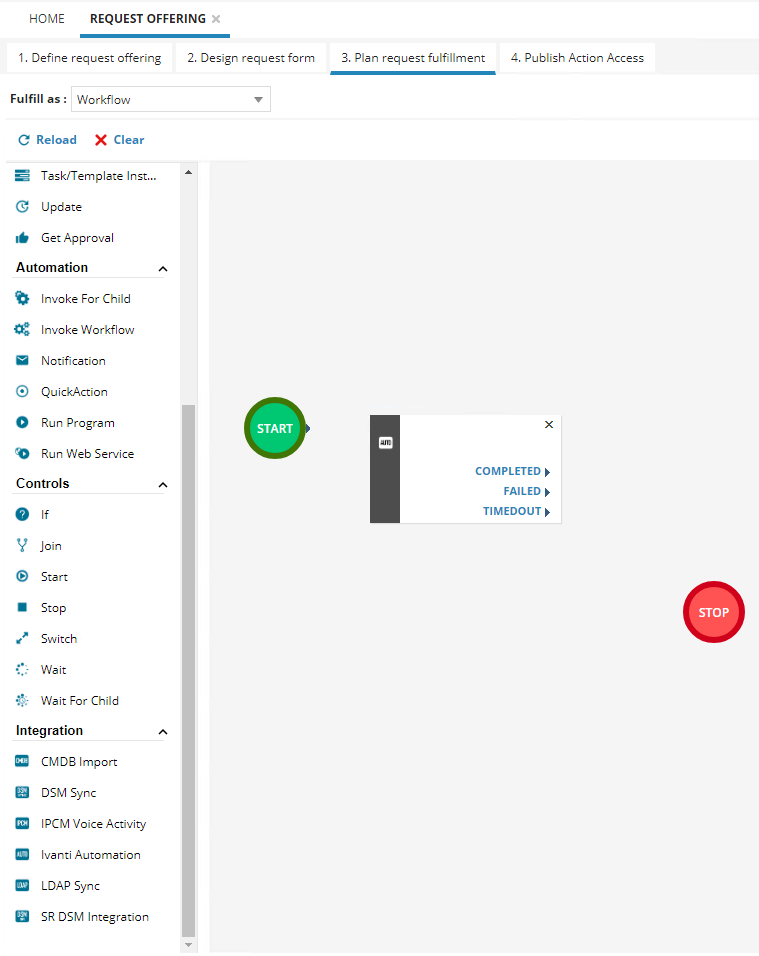
Double click on the Ivanti Automation and the screenshot below appears.
Name the Ivanti Automation in the Title field.

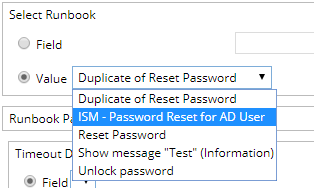
When the Runbook is just created the Runbook is probably not available. Check page 31 how to import the available Runbooks in Ivanti Service Manager.
In the Select Runbook option select the created Runbook for the drop-down list.
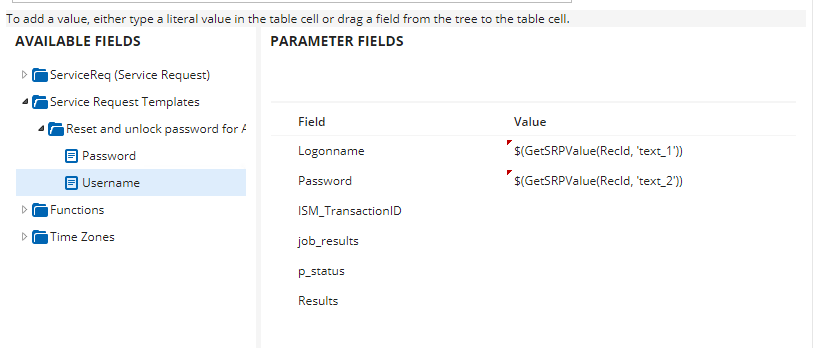
After selecting the correct Runbook the parameter fields are shown. The next step is to add the just created text fields from the Request Form to the parameters of the Runbook.
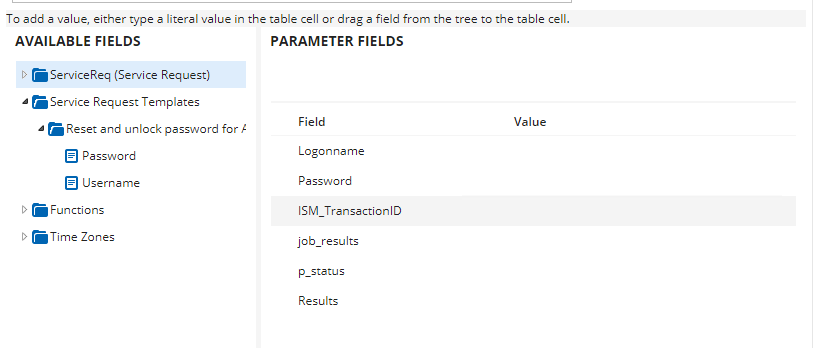
Go to Service Request Templates -> Reset and unlock password for AD User in the Available Fields list.
Drag the Username to the Logonname parameter and the Password to the Password parameter.
When finished the configuration should look like the screenshot below.
In the Runbook Options select the Parallel option to make sure the Runbook can run multiple times on the same time on the agent.
Close the Ivanti Automation Integration by selecting the Save button. The Ivanti Automation parameters are now connected to the Ivanti Service Manager fields.
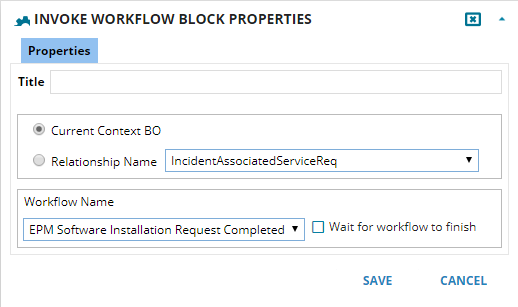
Next step in the workflow is adding the Invoke Workflow action. This action is in the list under Automation.
Double click on the Invoke Workflow action and select the option RequestWorkflowCompletion from the dropdown list and select Save.
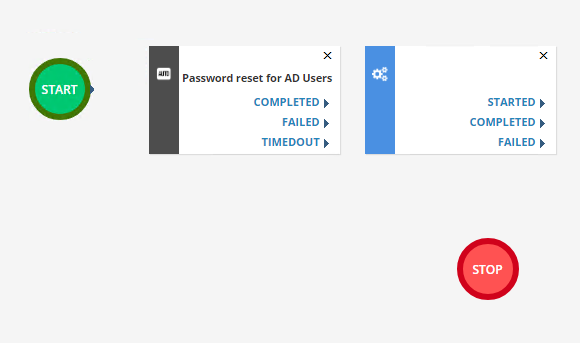
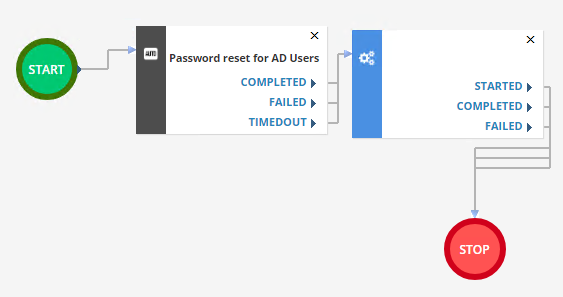
Last step for the workflow is drawing the connections.
From the Start you pull 1 line to the Ivanti Automation workflow action. From the Automation Workflow action, we need to pull 3 lines.
Pull a line for:
- Completed
- Failed
- Timedout
From the Invoke Workflow we also need to pull 3 lines to the Stop action.
Pull a line for:
- Started
- Completed
- Failed
When finished the workflow looks like the screenshot below:
Select Next on the bottom of the page. The last step is to publish the new Request.
Change the status to Published from the drop-down list and on the bottom of the page select + Add.
This creates an Any/Any under Org. Unit and Location and all actions are selected. Don’t change this.

Select Save & Exit from the bottom of the page.
It’s time to test the integration between Ivanti Service Manager and Ivanti Automation.
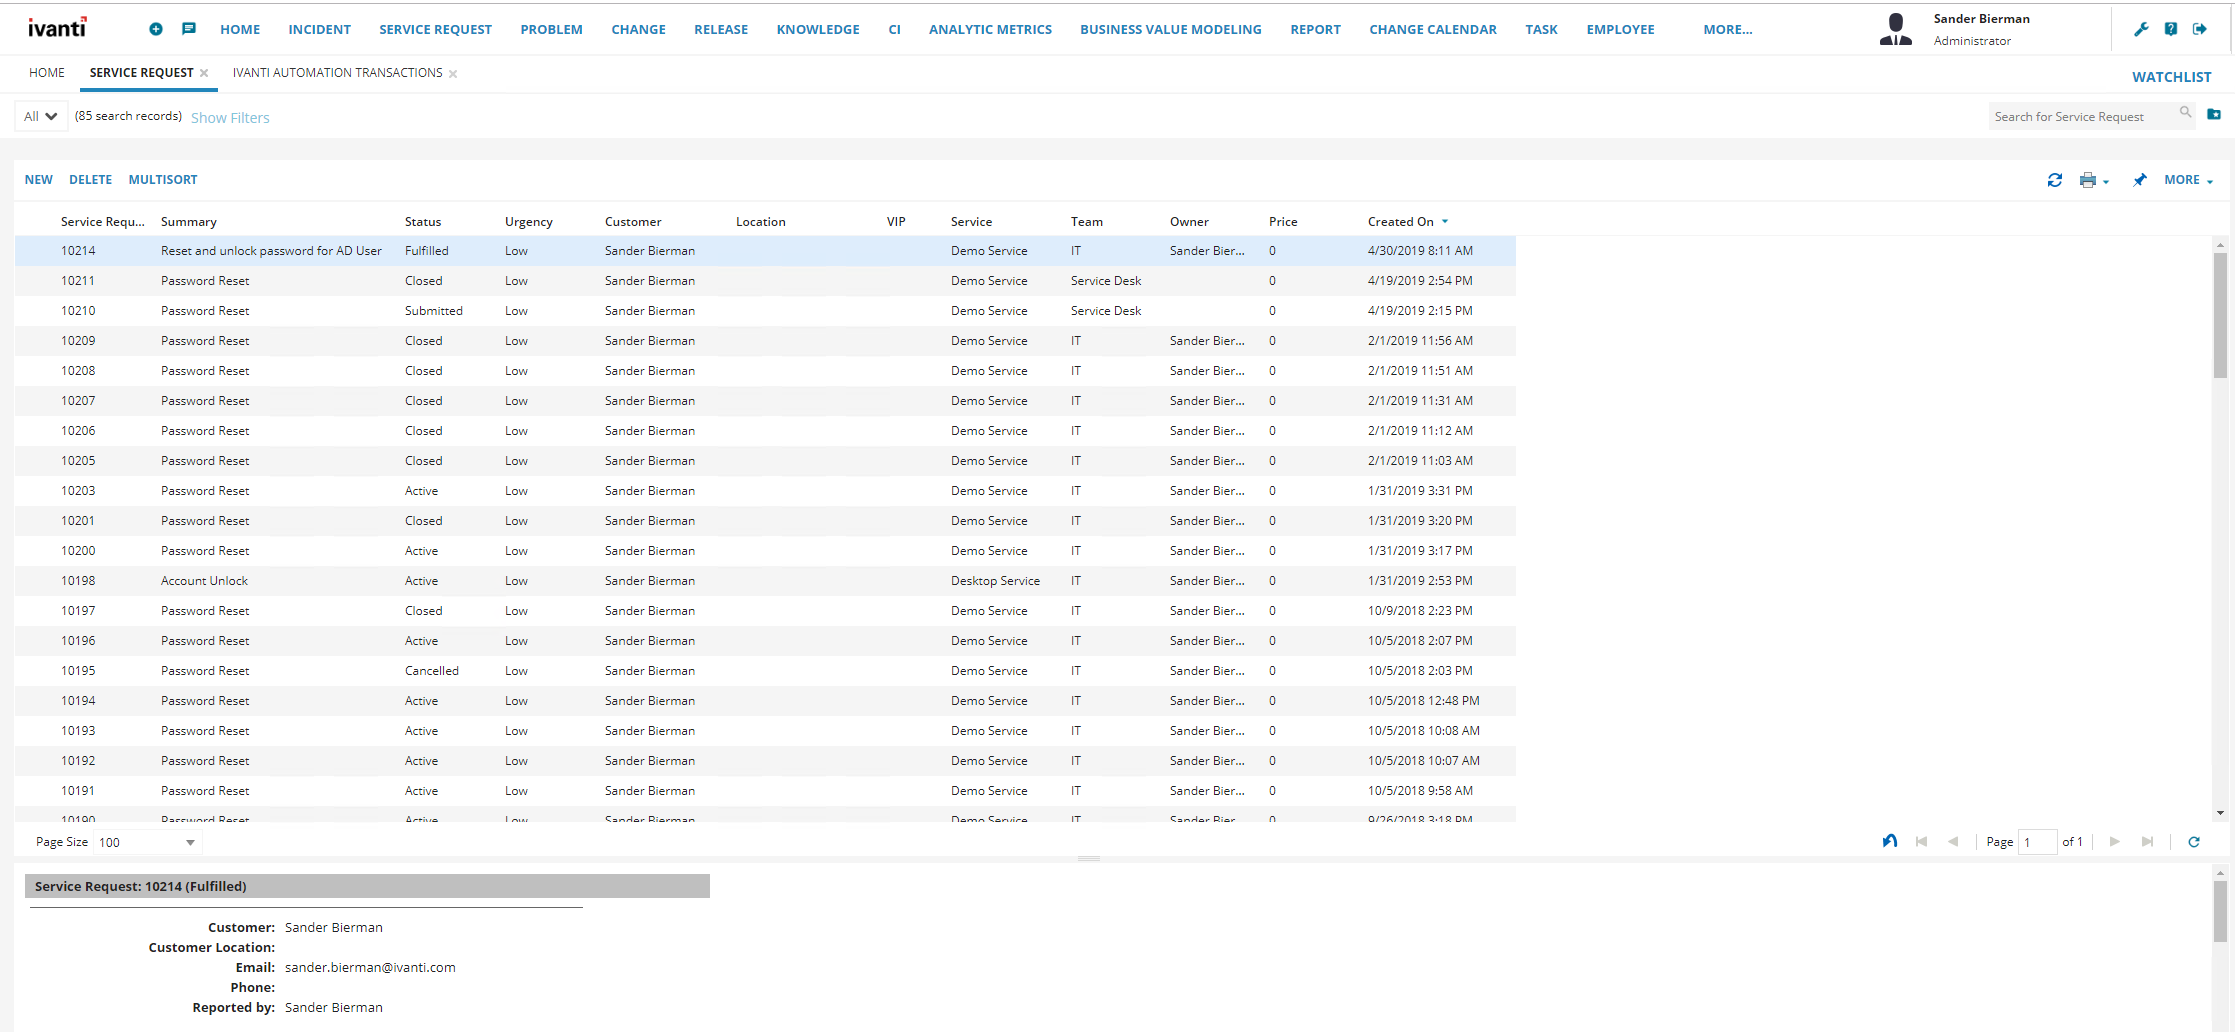
Select the option Service Request from the top menu.

A log is showed with executed Service Requests. Select the New option from the menu specific for the Service Request.
In the Service Request we must fill a name and Reported by.
Select the magnifier in the Customer field. Because we have no connection between the customer and the logonname we use in the request we can select any name available.
During the installation I created my own name and selected in both fields my name (also HeatAdmin).
After adding a name in the Parameters the Requests are shown.
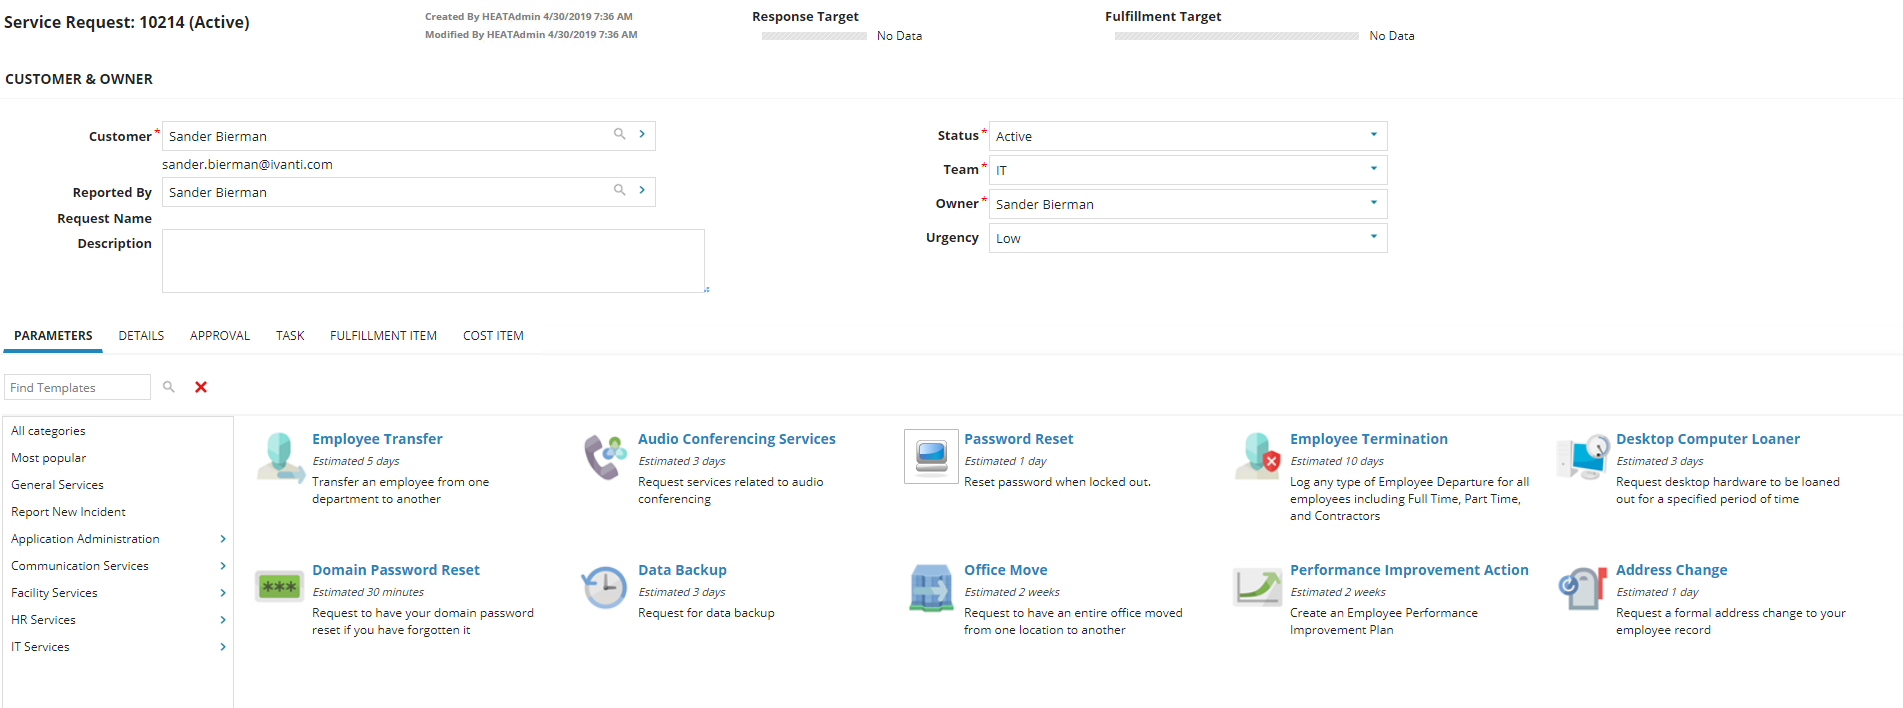
Because we created the Password Reset in the IT Services – Identity Management scroll to this folder on the left side.
When selecting the Identity Management, the Reset and unlock password for AD User is shown.

Select the new created Request and the two fields created (Username and Password) are visible.
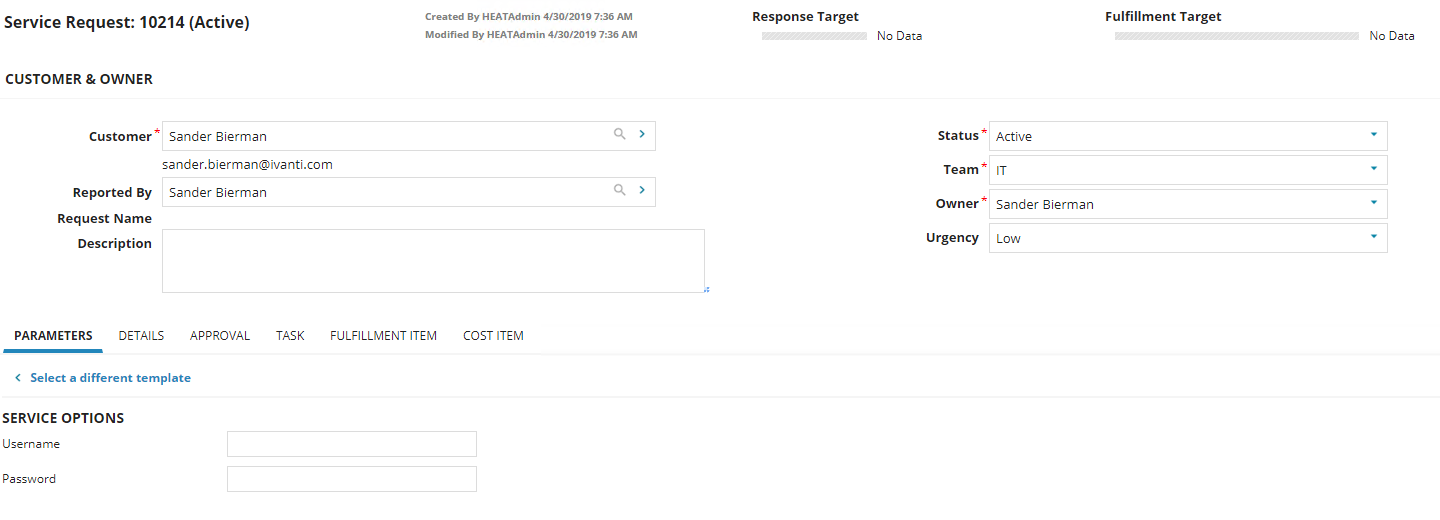
Make sure there is a test User Account in Active Directory to test with. I created an account Test User with logonname tuser.
Fill the two values like below.
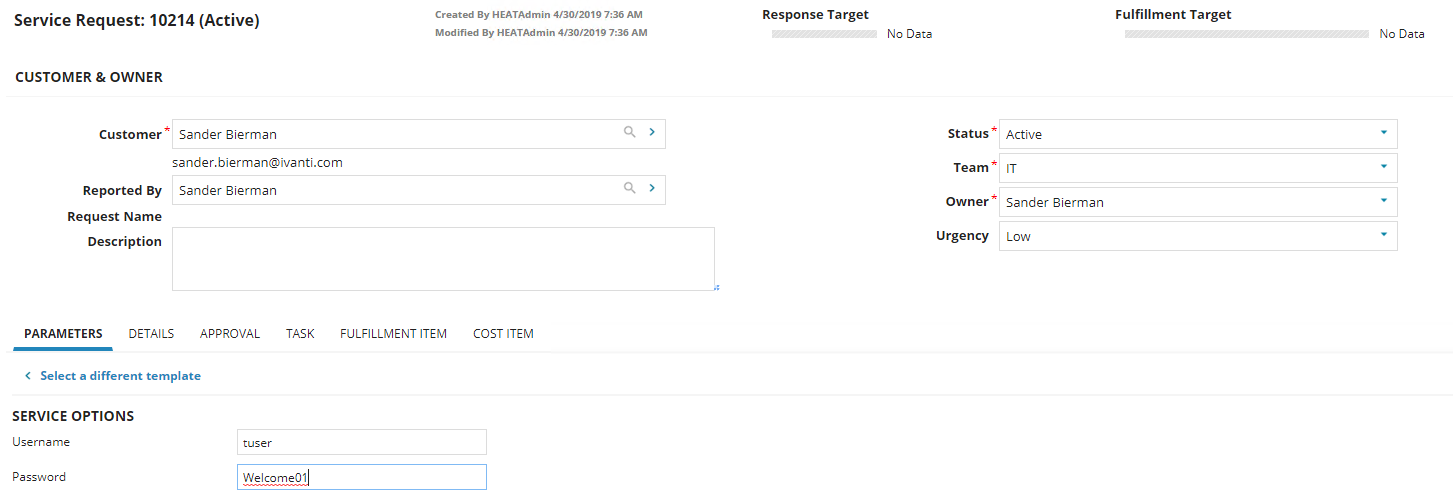
When finished select Save and the job is starting.
In the Ivanti Automation console the job is started and when active it appears in the Activity list.
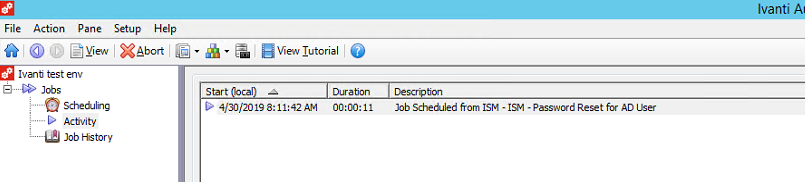
When the Ivanti Automation job is finished the job moves to the Job History and when the job finished successful a green check mark is placed before the job.

In Ivanti Service Manager check the Service Request log and refresh the log by selecting the Refresh icon (see arrow in below screenshot).
When the Service Request is successful executed the job status is Fulfilled.
Another check if the Runbook is executed successful is selecting the Ivanti Automation Transactions overview from the More menu.

When the job is completed the full integration between Ivanti Service Manager and Ivanti Automation is created and tested.
really useful info, thanks. i got an error message in logs Exception calling “GetResponse” with “0” argument(s): “The remote server returned an error: (500) Internal Server Error.” at update record ivanti service.
Please create a support ticket at Ivanti for further investigation.
I had the same issue, and https://forums.ivanti.com/s/question/0D54O00007SzbDlSAJ/getting-g-error-during-ad-user-creation-runbook-from-itsm?language=en_US solved it for me